
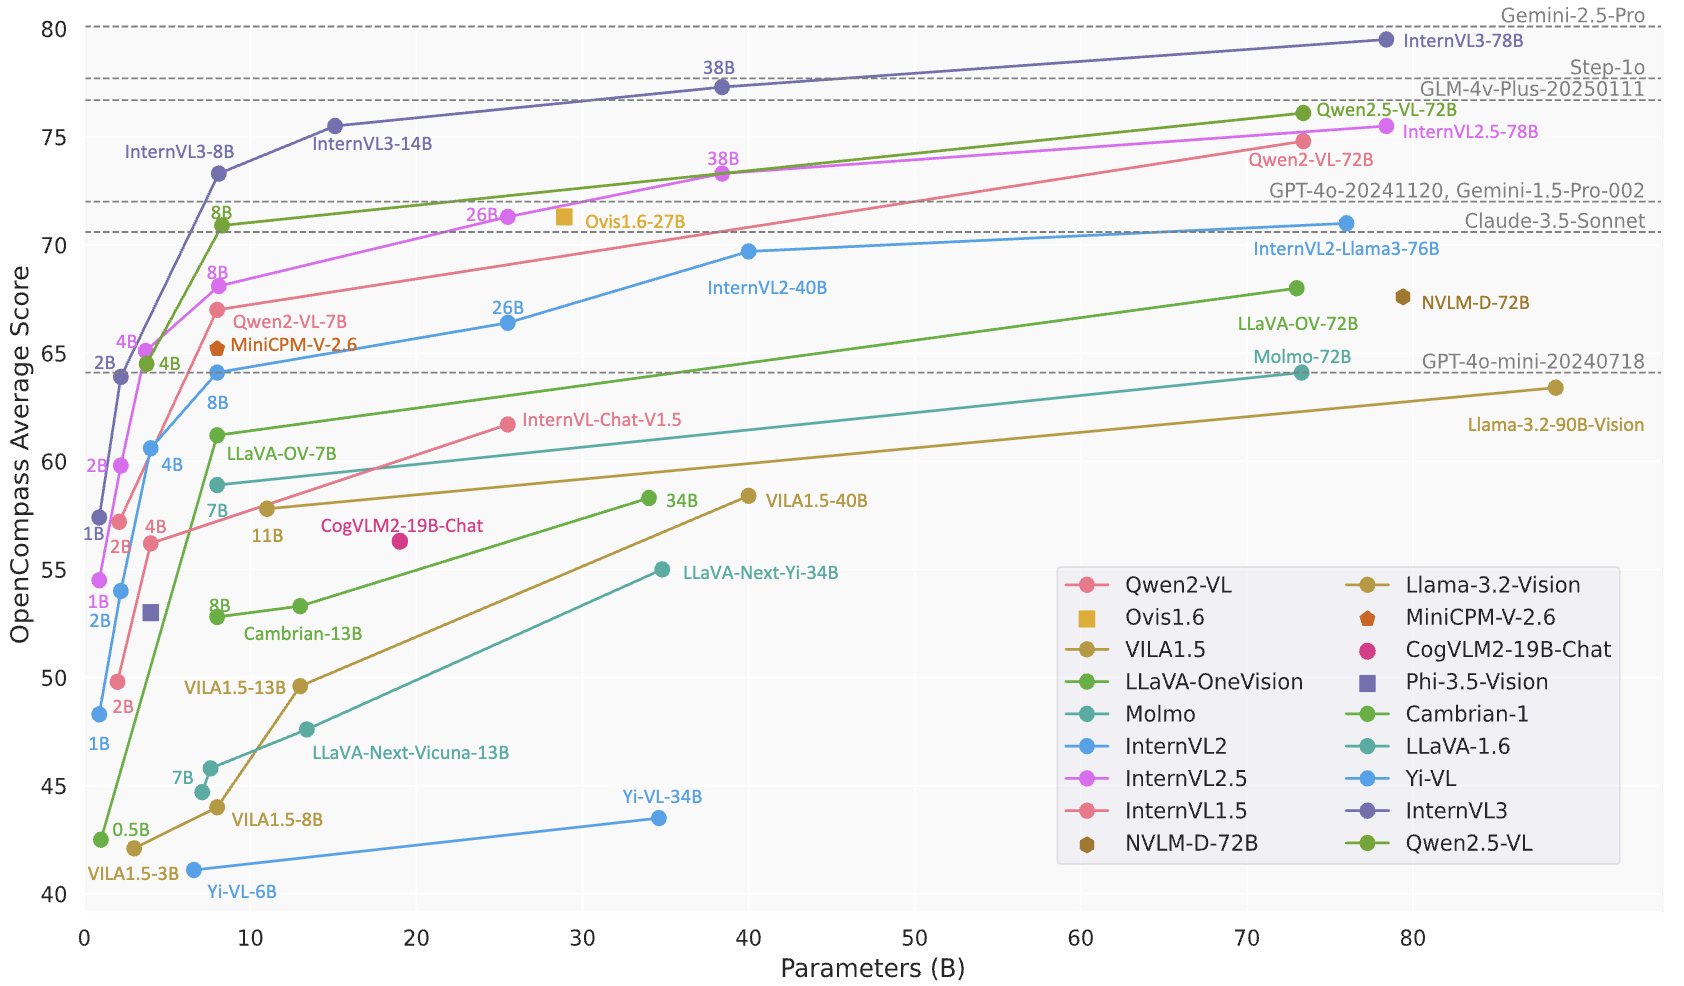
InternVL3开源:7种尺寸覆盖文、图、视频处理,多模态能力扩展至工业图像分析
OpenGVLab近期推出 InternVL3,这是一款先进的多模态大型语言模型 (MLLM) 系列,展现出卓越的整体性能。与 InternVL 2.5 相比,InternVL3 展现出卓越的多模态感
OpenGVLab近期推出 InternVL3,这是一款先进的多模态大型语言模型 (MLLM) 系列,展现出卓越的整体性能。与 InternVL 2.5 相比,InternVL3 展现出卓越的多模态感知和推理能力,同时进一步扩展了其多模态能力,涵盖工具使用、GUI 代理、工业图像分析、3D 视觉感知等。此外,得益于原生多模态预训练,InternVL3 系列的整体文本性能甚至优于 Qwen2.5 系列(后者是 InternVL3 中语言组件的初始化部分)。
模型合集链接:https://modelscope.cn/collections/InternVL3-5d0bdc54b7d84e
|
Model Name |
Vision Part |
Language Part |
|
InternVL3-1B |
||
|
InternVL3-2B |
||
|
InternVL3-8B |
||
|
InternVL3-9B |
||
|
InternVL3-14B |
||
|
InternVL3-38B |
||
|
InternVL3-78B |
模型架构
如下图所示,InternVL3保留了与InternVL 2.5及其前代产品 InternVL 1.5 和 2.0相同的模型架构,遵循“ViT-MLP-LLM”范式。InternVL3用随机初始化的 MLP projector,将全新增量预训练的 InternViT 与各种预训练的 LLM(包括 InternLM 3 和 Qwen 2.5)集成。
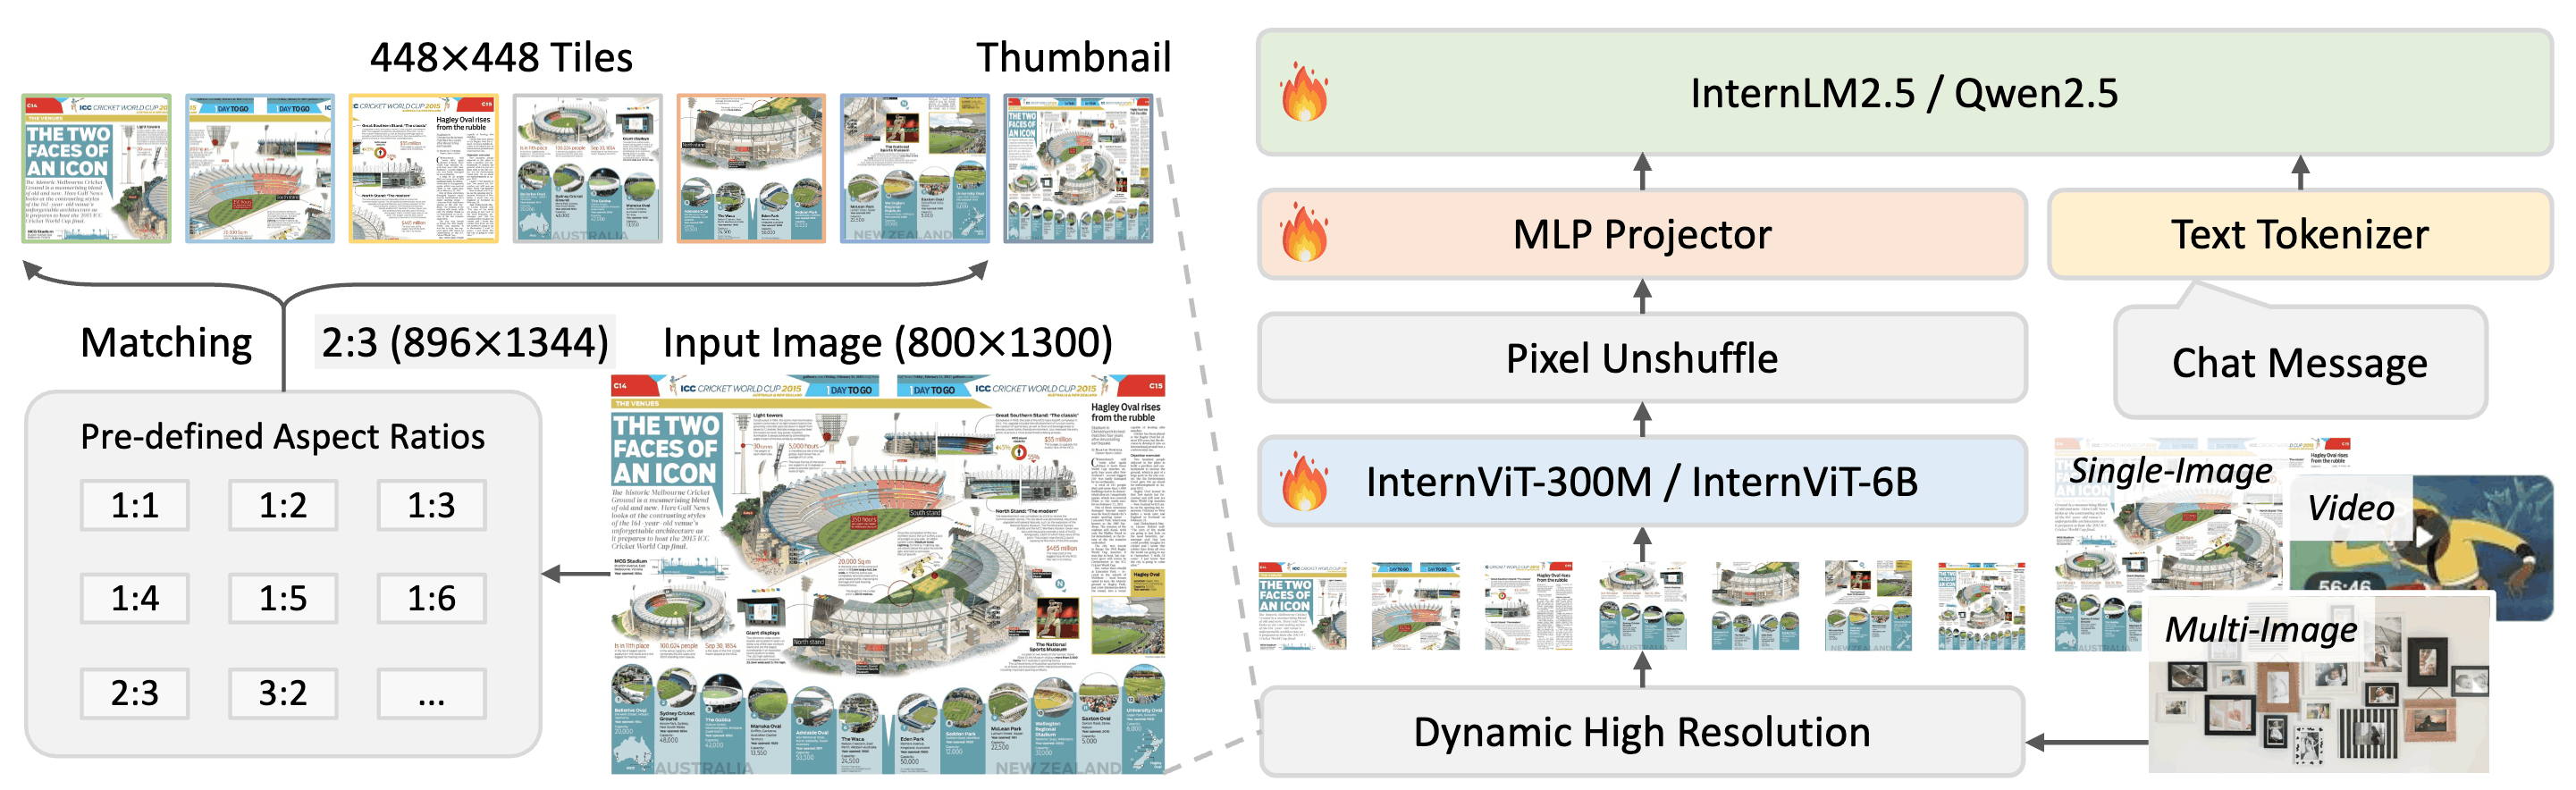
与上一版本一样,InternVL应用了像素反混洗操作,将视觉标记的数量减少到原来的四分之一。此外,InternVL3采用了与 InternVL 1.5 类似的动态分辨率策略,将图像划分为 448×448 像素的图块。从 InternVL 2.0 开始,关键区别在于额外引入了对多图像和视频数据的支持。
值得注意的是,在 InternVL3 中,我们集成了可变视觉位置编码 (V2PE),它为视觉标记提供了更小、更灵活的位置增量。得益于 V2PE,InternVL3 相比前代产品展现出更出色的长上下文理解能力。
模型推理
版本要求:transformers>=4.37.2
import math
import numpy as np
import torch
import torchvision.transforms as T
from decord import VideoReader, cpu
from PIL import Image
from torchvision.transforms.functional import InterpolationMode
from modelscope import AutoModel, AutoTokenizer
IMAGENET_MEAN = (0.485, 0.456, 0.406)
IMAGENET_STD = (0.229, 0.224, 0.225)
def build_transform(input_size):
MEAN, STD = IMAGENET_MEAN, IMAGENET_STD
transform = T.Compose([
T.Lambda(lambda img: img.convert('RGB') if img.mode != 'RGB' else img),
T.Resize((input_size, input_size), interpolation=InterpolationMode.BICUBIC),
T.ToTensor(),
T.Normalize(mean=MEAN, std=STD)
])
return transform
def find_closest_aspect_ratio(aspect_ratio, target_ratios, width, height, image_size):
best_ratio_diff = float('inf')
best_ratio = (1, 1)
area = width * height
for ratio in target_ratios:
target_aspect_ratio = ratio[0] / ratio[1]
ratio_diff = abs(aspect_ratio - target_aspect_ratio)
if ratio_diff < best_ratio_diff:
best_ratio_diff = ratio_diff
best_ratio = ratio
elif ratio_diff == best_ratio_diff:
if area > 0.5 * image_size * image_size * ratio[0] * ratio[1]:
best_ratio = ratio
return best_ratio
def dynamic_preprocess(image, min_num=1, max_num=12, image_size=448, use_thumbnail=False):
orig_width, orig_height = image.size
aspect_ratio = orig_width / orig_height
# calculate the existing image aspect ratio
target_ratios = set(
(i, j) for n in range(min_num, max_num + 1) for i in range(1, n + 1) for j in range(1, n + 1) if
i * j <= max_num and i * j >= min_num)
target_ratios = sorted(target_ratios, key=lambda x: x[0] * x[1])
# find the closest aspect ratio to the target
target_aspect_ratio = find_closest_aspect_ratio(
aspect_ratio, target_ratios, orig_width, orig_height, image_size)
# calculate the target width and height
target_width = image_size * target_aspect_ratio[0]
target_height = image_size * target_aspect_ratio[1]
blocks = target_aspect_ratio[0] * target_aspect_ratio[1]
# resize the image
resized_img = image.resize((target_width, target_height))
processed_images = []
for i in range(blocks):
box = (
(i % (target_width // image_size)) * image_size,
(i // (target_width // image_size)) * image_size,
((i % (target_width // image_size)) + 1) * image_size,
((i // (target_width // image_size)) + 1) * image_size
)
# split the image
split_img = resized_img.crop(box)
processed_images.append(split_img)
assert len(processed_images) == blocks
if use_thumbnail and len(processed_images) != 1:
thumbnail_img = image.resize((image_size, image_size))
processed_images.append(thumbnail_img)
return processed_images
def load_image(image_file, input_size=448, max_num=12):
image = Image.open(image_file).convert('RGB')
transform = build_transform(input_size=input_size)
images = dynamic_preprocess(image, image_size=input_size, use_thumbnail=True, max_num=max_num)
pixel_values = [transform(image) for image in images]
pixel_values = torch.stack(pixel_values)
return pixel_values
def split_model(model_name):
device_map = {}
world_size = torch.cuda.device_count()
config = AutoConfig.from_pretrained(model_path, trust_remote_code=True)
num_layers = config.llm_config.num_hidden_layers
# Since the first GPU will be used for ViT, treat it as half a GPU.
num_layers_per_gpu = math.ceil(num_layers / (world_size - 0.5))
num_layers_per_gpu = [num_layers_per_gpu] * world_size
num_layers_per_gpu[0] = math.ceil(num_layers_per_gpu[0] * 0.5)
layer_cnt = 0
for i, num_layer in enumerate(num_layers_per_gpu):
for j in range(num_layer):
device_map[f'language_model.model.layers.{layer_cnt}'] = i
layer_cnt += 1
device_map['vision_model'] = 0
device_map['mlp1'] = 0
device_map['language_model.model.tok_embeddings'] = 0
device_map['language_model.model.embed_tokens'] = 0
device_map['language_model.output'] = 0
device_map['language_model.model.norm'] = 0
device_map['language_model.model.rotary_emb'] = 0
device_map['language_model.lm_head'] = 0
device_map[f'language_model.model.layers.{num_layers - 1}'] = 0
return device_map
# If you set `load_in_8bit=True`, you will need two 80GB GPUs.
# If you set `load_in_8bit=False`, you will need at least three 80GB GPUs.
path = 'OpenGVLab/InternVL3-1B'
model = AutoModel.from_pretrained(
path,
torch_dtype=torch.bfloat16,
load_in_8bit=False,
low_cpu_mem_usage=True,
use_flash_attn=True,
trust_remote_code=True,
device_map="auto").eval()
tokenizer = AutoTokenizer.from_pretrained(path, trust_remote_code=True, use_fast=False)
# set the max number of tiles in `max_num`
pixel_values = load_image('./example/image1.jpg', max_num=12).to(torch.bfloat16).cuda()
generation_config = dict(max_new_tokens=1024, do_sample=True)
# pure-text conversation (纯文本对话)
question = 'Hello, who are you?'
response, history = model.chat(tokenizer, None, question, generation_config, history=None, return_history=True)
print(f'User: {question}\nAssistant: {response}')
question = 'Can you tell me a story?'
response, history = model.chat(tokenizer, None, question, generation_config, history=history, return_history=True)
print(f'User: {question}\nAssistant: {response}')
# single-image single-round conversation (单图单轮对话)
question = '<image>\nPlease describe the image shortly.'
response = model.chat(tokenizer, pixel_values, question, generation_config)
print(f'User: {question}\nAssistant: {response}')
# single-image multi-round conversation (单图多轮对话)
question = '<image>\nPlease describe the image in detail.'
response, history = model.chat(tokenizer, pixel_values, question, generation_config, history=None, return_history=True)
print(f'User: {question}\nAssistant: {response}')
question = 'Please write a poem according to the image.'
response, history = model.chat(tokenizer, pixel_values, question, generation_config, history=history, return_history=True)
print(f'User: {question}\nAssistant: {response}')
# multi-image multi-round conversation, combined images (多图多轮对话,拼接图像)
pixel_values1 = load_image('./example/image1.jpg', max_num=12).to(torch.bfloat16).cuda()
pixel_values2 = load_image('./example/image2.jpg', max_num=12).to(torch.bfloat16).cuda()
pixel_values = torch.cat((pixel_values1, pixel_values2), dim=0)
question = '<image>\nDescribe the two images in detail.'
response, history = model.chat(tokenizer, pixel_values, question, generation_config,
history=None, return_history=True)
print(f'User: {question}\nAssistant: {response}')
question = 'What are the similarities and differences between these two images.'
response, history = model.chat(tokenizer, pixel_values, question, generation_config,
history=history, return_history=True)
print(f'User: {question}\nAssistant: {response}')
# multi-image multi-round conversation, separate images (多图多轮对话,独立图像)
pixel_values1 = load_image('./example/image1.jpg', max_num=12).to(torch.bfloat16).cuda()
pixel_values2 = load_image('./example/image2.jpg', max_num=12).to(torch.bfloat16).cuda()
pixel_values = torch.cat((pixel_values1, pixel_values2), dim=0)
num_patches_list = [pixel_values1.size(0), pixel_values2.size(0)]
question = 'Image-1: <image>\nImage-2: <image>\nDescribe the two images in detail.'
response, history = model.chat(tokenizer, pixel_values, question, generation_config,
num_patches_list=num_patches_list,
history=None, return_history=True)
print(f'User: {question}\nAssistant: {response}')
question = 'What are the similarities and differences between these two images.'
response, history = model.chat(tokenizer, pixel_values, question, generation_config,
num_patches_list=num_patches_list,
history=history, return_history=True)
print(f'User: {question}\nAssistant: {response}')
# batch inference, single image per sample (单图批处理)
pixel_values1 = load_image('./example/image1.jpg', max_num=12).to(torch.bfloat16).cuda()
pixel_values2 = load_image('./example/image2.jpg', max_num=12).to(torch.bfloat16).cuda()
num_patches_list = [pixel_values1.size(0), pixel_values2.size(0)]
pixel_values = torch.cat((pixel_values1, pixel_values2), dim=0)
questions = ['<image>\nDescribe the image in detail.'] * len(num_patches_list)
responses = model.batch_chat(tokenizer, pixel_values,
num_patches_list=num_patches_list,
questions=questions,
generation_config=generation_config)
for question, response in zip(questions, responses):
print(f'User: {question}\nAssistant: {response}')
# video multi-round conversation (视频多轮对话)
def get_index(bound, fps, max_frame, first_idx=0, num_segments=32):
if bound:
start, end = bound[0], bound[1]
else:
start, end = -100000, 100000
start_idx = max(first_idx, round(start * fps))
end_idx = min(round(end * fps), max_frame)
seg_size = float(end_idx - start_idx) / num_segments
frame_indices = np.array([
int(start_idx + (seg_size / 2) + np.round(seg_size * idx))
for idx in range(num_segments)
])
return frame_indices
def load_video(video_path, bound=None, input_size=448, max_num=1, num_segments=32):
vr = VideoReader(video_path, ctx=cpu(0), num_threads=1)
max_frame = len(vr) - 1
fps = float(vr.get_avg_fps())
pixel_values_list, num_patches_list = [], []
transform = build_transform(input_size=input_size)
frame_indices = get_index(bound, fps, max_frame, first_idx=0, num_segments=num_segments)
for frame_index in frame_indices:
img = Image.fromarray(vr[frame_index].asnumpy()).convert('RGB')
img = dynamic_preprocess(img, image_size=input_size, use_thumbnail=True, max_num=max_num)
pixel_values = [transform(tile) for tile in img]
pixel_values = torch.stack(pixel_values)
num_patches_list.append(pixel_values.shape[0])
pixel_values_list.append(pixel_values)
pixel_values = torch.cat(pixel_values_list)
return pixel_values, num_patches_list
video_path = './example/red-panda.mp4'
pixel_values, num_patches_list = load_video(video_path, num_segments=8, max_num=1)
pixel_values = pixel_values.to(torch.bfloat16).cuda()
video_prefix = ''.join([f'Frame{i+1}: <image>\n' for i in range(len(num_patches_list))])
question = video_prefix + 'What is the red panda doing?'
# Frame1: <image>\nFrame2: <image>\n...\nFrame8: <image>\n{question}
response, history = model.chat(tokenizer, pixel_values, question, generation_config,
num_patches_list=num_patches_list, history=None, return_history=True)
print(f'User: {question}\nAssistant: {response}')
question = 'Describe this video in detail.'
response, history = model.chat(tokenizer, pixel_values, question, generation_config,
num_patches_list=num_patches_list, history=history, return_history=True)
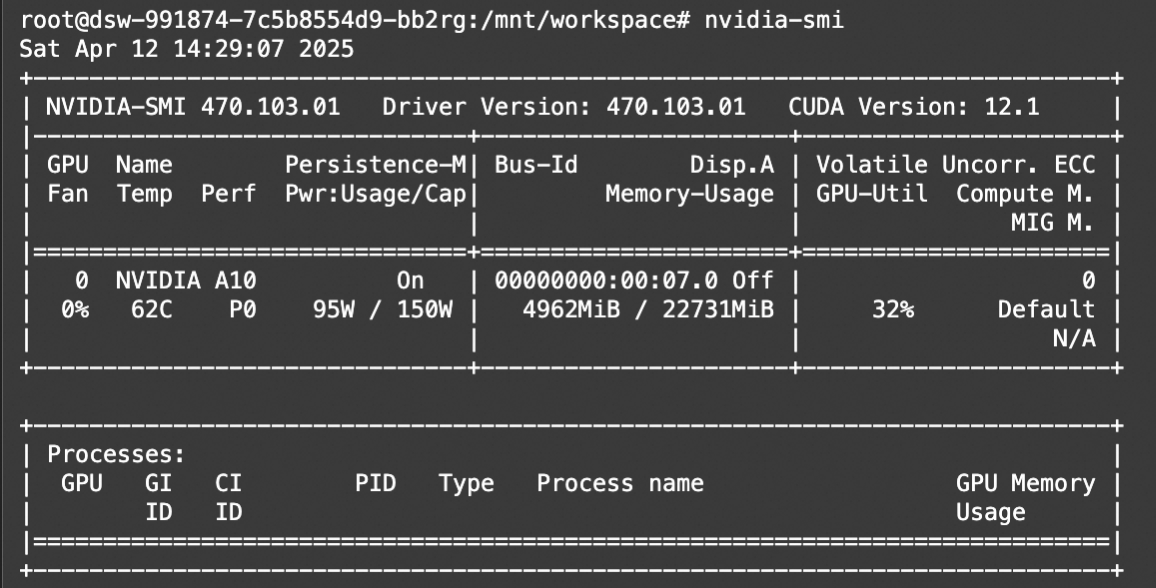
print(f'User: {question}\nAssistant: {response}')显存占用:
模型部署
环境安装
pip install lmdeploy>=0.7.3使用LMDeploy's api_server 部署成OpenAI兼容API
modelscope download --model=OpenGVLab/InternVL3-1B --local_dir ./InternVL3-1B
lmdeploy serve api_server ./InternVL3-1B --server-port 23333 --tp 1
# 如果lmdeploy<0.7.3, 使用如下命令
# lmdeploy serve api_server ./InternVL3-1B --chat-template internvl2_5 --server-port 23333 --tp 1
模型调用
from openai import OpenAI

client = OpenAI(api_key='YOUR_API_KEY', base_url='http://0.0.0.0:23333/v1')
model_name = client.models.list().data[0].id
response = client.chat.completions.create(
    model=model_name,
    messages=[{
        'role':
        'user',
        'content': [{
            'type': 'text',
            'text': 'describe this image',
        }, {
            'type': 'image_url',
            'image_url': {
                'url':
                'https://modelscope.oss-cn-beijing.aliyuncs.com/resource/tiger.jpeg',
            },
        }],
    }],
    temperature=0.8,
    top_p=0.8)
print(response)
模型微调
ms-swift已经支持了InternVL3系列模型的微调。ms-swift是魔搭社区官方提供的大模型与多模态大模型训练部署框架。ms-swift开源地址:https://github.com/modelscope/ms-swift
我们将展示可运行的微调demo,并给出自定义数据集的格式。
在开始微调之前,请确保您的环境已准备妥当。
# pip install git+https://github.com/modelscope/ms-swift.git

git clone https://github.com/modelscope/ms-swift.git
cd ms-swift
pip install -e .
以 InternVL3-8B模型为例,使用OCR图像数据集训练,微调脚本如下:
CUDA_VISIBLE_DEVICES=0 \
swift sft \
    --model OpenGVLab/InternVL3-8B \
    --dataset 'AI-ModelScope/LaTeX_OCR:human_handwrite#20000' \
    --train_type lora \
    --torch_dtype bfloat16 \
    --num_train_epochs 1 \
    --per_device_train_batch_size 1 \
    --per_device_eval_batch_size 1 \
    --learning_rate 1e-4 \
    --gradient_accumulation_steps 16 \
    --eval_steps 200 \
    --save_steps 200 \
    --save_total_limit 5 \
    --logging_steps 5 \
    --max_length 2048 \
    --output_dir output \
    --warmup_ratio 0.05 \
    --dataloader_num_workers 4
训练显存占用:

如果要使用自定义数据集进行训练,你可以参考以下格式,并指定`--dataset <dataset_path>`。
{"messages": [{"role": "user", "content": "<image><image>两张图片有什么区别"}, {"role": "assistant", "content": "前一张是小猫,后一张是小狗"}], "images": ["/xxx/x.jpg", "/xxx/x.png"]}训练完成后,使用以下命令对训练后的权重进行推理,这里的`--adapters`需要替换成训练生成的last checkpoint文件夹。
CUDA_VISIBLE_DEVICES=0 \
swift infer \
    --adapters output/vx-xxx/checkpoint-xxx \
    --stream false \
    --max_batch_size 1 \
    --load_data_args true \
    --max_new_tokens 2048
推送模型到ModelScope:
CUDA_VISIBLE_DEVICES=0 \
swift export \
    --adapters output/vx-xxx/checkpoint-xxx \
    --push_to_hub true \
    --hub_model_id '<your-model-id>' \
    --hub_token '<your-sdk-token>'
ModelScope旨在打造下一代开源的模型即服务共享平台,为泛AI开发者提供灵活、易用、低成本的一站式模型服务产品,让模型应用更简单!
更多推荐


 2
2 1
1- 0


 已为社区贡献615条内容

所有评论(0)