# 环境安装
!git clone https://github.com/VectorSpaceLab/OmniGen.git
%cd OmniGen
!pip install -e .
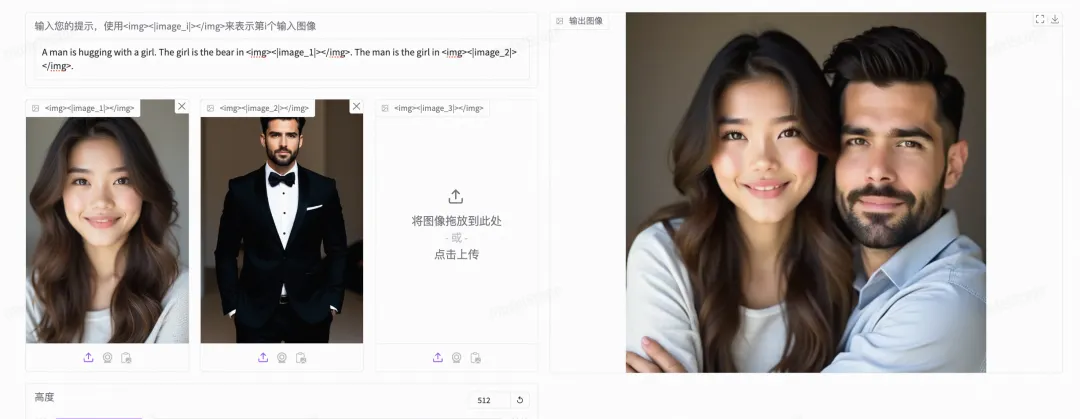
冬天到了,用OmniGen生成一个温暖的拥抱
近期,北京智源人工智能研究院(BAAI)正式推出了一款名为OmniGen的新型多功能图像生成模型。
01引言
近期,北京智源人工智能研究院(BAAI)正式推出了一款名为OmniGen的新型多功能图像生成模型。这一创新性扩散模型架构旨在为用户提供一站式的图像生成解决方案,涵盖从文本生成图像、图像编辑到主题驱动生成以及视觉条件生成等多种应用场景,标志着人工智能图像生成技术的进一步成熟。
OmniGen 是一个统一的图像生成模型,可以根据多模态提示生成各种图像。它设计简单、灵活且易于使用。本文提供了推理代码和Comfyui运行方式,以便每个人都可以探索 OmniGen 的更多功能。
现有的图像生成模型往往需要加载多个额外的网络模块(如 ControlNet、IP-Adapter、Reference-Net 等)并执行额外的预处理步骤(例如人脸检测、姿势估计、裁剪等)才能生成令人满意的图像。但认为未来的图像生成范式应该更加简单灵活,即直接通过任意多模态指令生成各种图像,而无需额外的插件和操作,类似于 GPT 在语言生成中的工作方式。
用户可以轻松地微调 OmniGen,而不必担心为特定任务设计模型;你只需要准备相应的数据,然后运行训练脚本即可。想象力不再受限;每个人都可以构造任何图像生成任务,可以实现非常有趣、精彩和富有创意的事情。
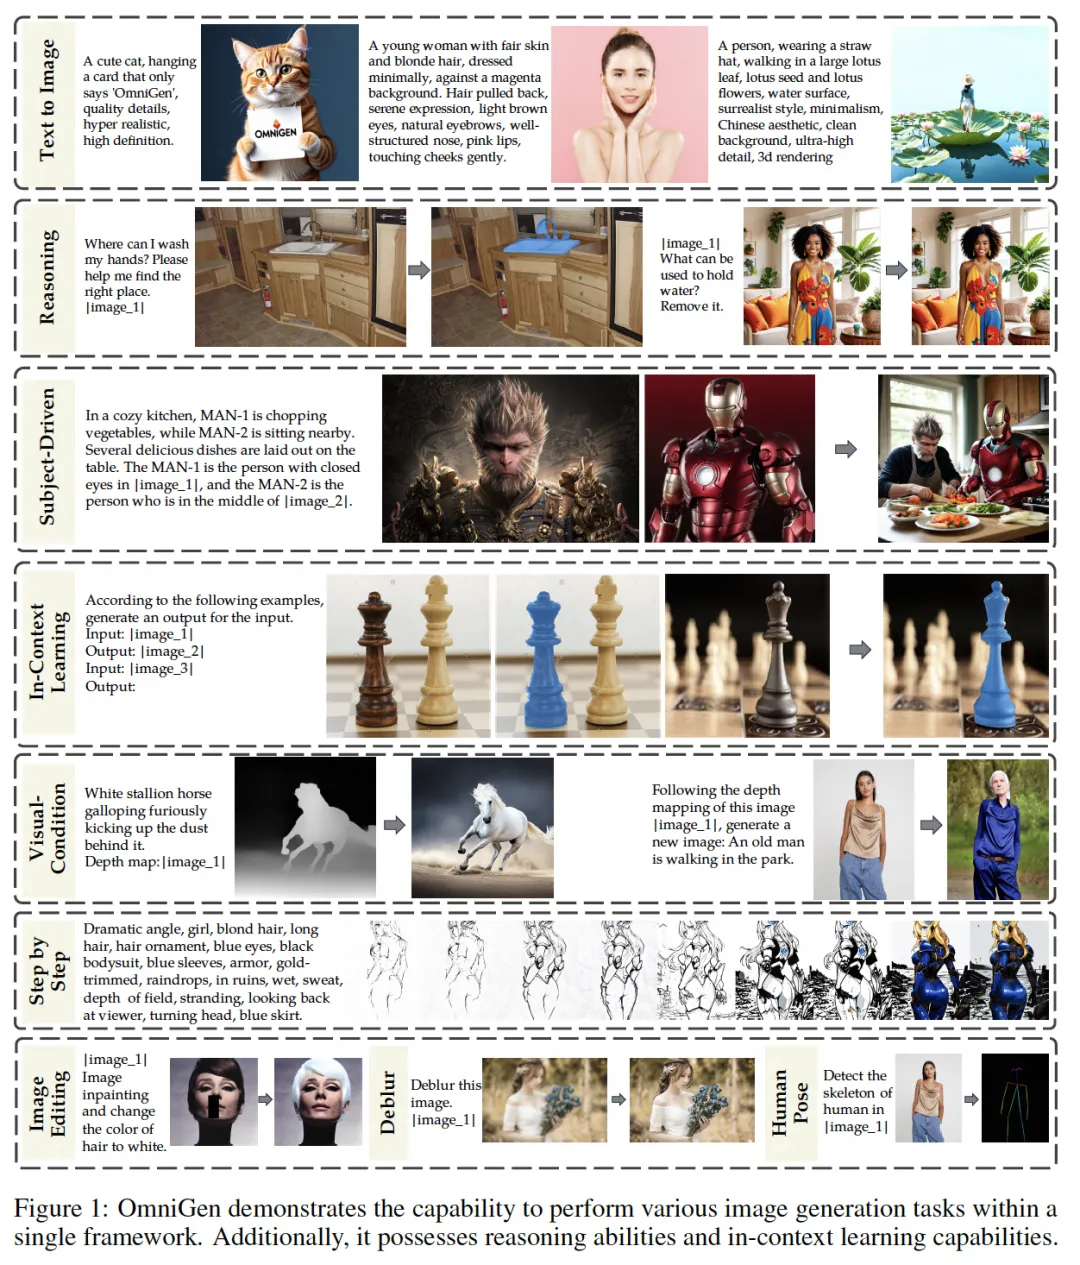
核心亮点
-
新的图像生成模型OmniGen,能够处理多种任务和条件,并且具有推理能力和学习能力。
-
OmniGen不需要额外模块来处理控制条件,具有高度简化的架构,用户友好,可简化工作流程。
-
OmniGen通过统一格式的学习,能够跨任务转移知识,处理未见过的任务和领域,并具备新颖的能力。
-
OmniGen可以同时处理多个任务和同一任务的不同指令,具有灵活性和广泛应用潜力。
-
OmniGen能够从参考图像中提取相关信息并基于捕捉到的条件生成新图像,无需使用其他模型进行显式条件提取
模型网络
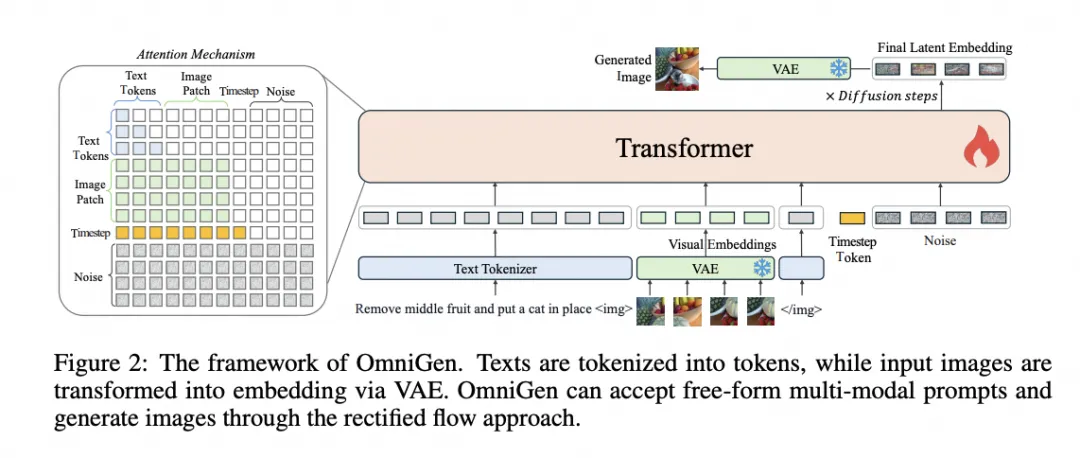
OmniGen框架采用由变分自编码器(VAE)和预训练的大规模Transformer模型组成的架构。具体来说,VAE从图像中提取连续的视觉特征,而Transformer模型则根据输入条件生成图像。在本文中,使用SDXL中的VAE,并将其冻结以进行训练。使用Phi-3来初始化Transformer模型,继承其出色的文本处理能力。不同于最先进的扩散模型需要额外的编码器对条件信息进行预处理(例如Clip文本编码器和图像编码器),OmniGen本身就可以编码条件信息,显著简化了管道。此外,OmniGen联合建模文本和图像在一个模型内,而不是像现有工作那样分别用不同的编码器独立地建模不同输入条件,这些工作缺乏不同模态条件之间的交互。
🔗模型链接:
https://modelscope.cn/models/BAAI/OmniGen-v1
🔗体验链接:
https://modelscope.cn/studios/chuanSir/OmniGen
02 魔搭最佳实践
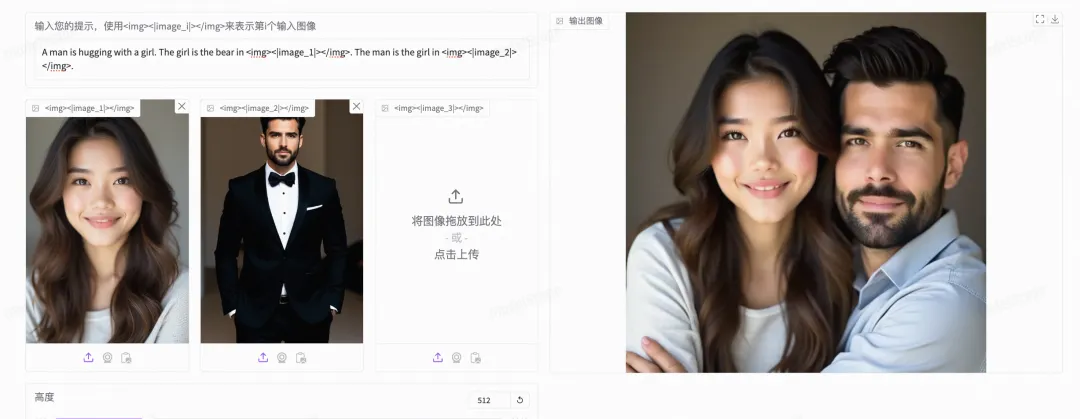
🫂推理代码(来个拥抱!)
环境安装
模型下载和推理
from OmniGen import OmniGenPipelinefrom modelscope import snapshot_downloadmodel_dir = snapshot_download("BAAI/OmniGen-v1")pipe = OmniGenPipeline.from_pretrained(model_dir) ## Multi-modal to Image# In the prompt, we use the placeholder to represent the image. The image placeholder should be in the format of <img><|image_*|></img># You can add multiple images in the input_images. Please ensure that each image has its placeholder. For example, for the list input_images [img1_path, img2_path], the prompt needs to have two placeholders: <img><|image_1|></img>, <img><|image_2|></img>.images = pipe( prompt="A man is hugging with a girl. The girl is the bear in <img><|image_1|></img>. The man is the girl in <img><|image_2|></img>.", input_images=["/mnt/workspace/bear.jpg","/mnt/workspace/girl.jpg"], height=512, width=512, guidance_scale=2, img_guidance_scale=1.6, seed=42)images[0].save("example_ti2i.png") # save output PIL image
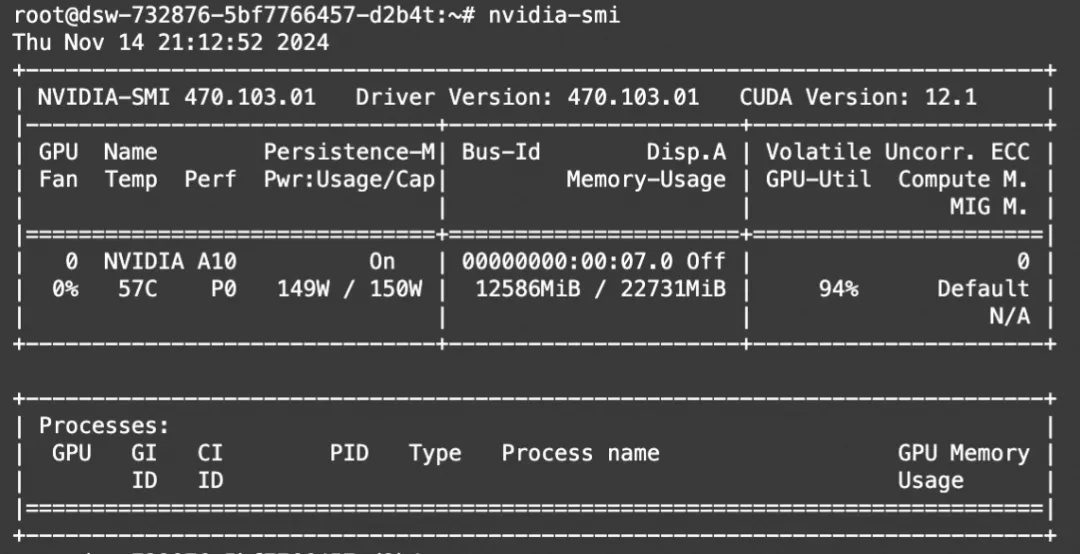
显存占用:
🔗notebook链接:https://modelscope.cn/notebook/share/ipynb/4dcfd153/OmniInference.ipynb
03Comfyui实战
环境安装
# 环境安装
!git clone https://github.com/VectorSpaceLab/OmniGen.git
%cd OmniGen
!pip install -e .
%cd ..
下载依赖
# #@title Environment Setup

from pathlib import Path

OPTIONS = {}
UPDATE_COMFY_UI = True  #@param {type:"boolean"}
INSTALL_COMFYUI_MANAGER = True  #@param {type:"boolean"}
INSTALL_CUSTOM_NODES_DEPENDENCIES = True  #@param {type:"boolean"}
INSTALL_CUSTOM_NODES_OMNIGEN = True #@param {type:"boolean"}

OPTIONS['UPDATE_COMFY_UI'] = UPDATE_COMFY_UI
OPTIONS['INSTALL_COMFYUI_MANAGER'] = INSTALL_COMFYUI_MANAGER
OPTIONS['INSTALL_CUSTOM_NODES_DEPENDENCIES'] = INSTALL_CUSTOM_NODES_DEPENDENCIES
OPTIONS['INSTALL_CUSTOM_NODES_OMNIGEN'] = INSTALL_CUSTOM_NODES_OMNIGEN

current_dir = !pwd
WORKSPACE = f"{current_dir[0]}/ComfyUI"


![ ! -d $WORKSPACE ] && echo -= Initial setup ComfyUI =- && git clone https://github.com/comfyanonymous/ComfyUI
%cd $WORKSPACE

if OPTIONS['UPDATE_COMFY_UI']:
  !echo "-= Updating ComfyUI =-"
  !git pull


if OPTIONS['INSTALL_COMFYUI_MANAGER']:
  %cd custom_nodes
  ![ ! -d ComfyUI-Manager ] && echo -= Initial setup ComfyUI-Manager =- && git clone https://github.com/ltdrdata/ComfyUI-Manager
  %cd ComfyUI-Manager
  !git pull

if OPTIONS['INSTALL_CUSTOM_NODES_OMNIGEN']:
  %cd ..
  !echo -= Initial setup ComfyUI_Omnigen =- && git clone https://github.com/1038lab/ComfyUI-OmniGen.git
运行Comfyui页面
!wget "https://modelscope.oss-cn-beijing.aliyuncs.com/resource/cloudflared-linux-amd64.deb"
!dpkg -i cloudflared-linux-amd64.deb

%cd /mnt/workspace/ComfyUI
import subprocess
import threading
import time
import socket
import urllib.request

def iframe_thread(port):
  while True:
      time.sleep(0.5)
      sock = socket.socket(socket.AF_INET, socket.SOCK_STREAM)
      result = sock.connect_ex(('127.0.0.1', port))
      if result == 0:
        break
      sock.close()
  print("\nComfyUI finished loading, trying to launch cloudflared (if it gets stuck here cloudflared is having issues)\n")

  p = subprocess.Popen(["cloudflared", "tunnel", "--url", "http://127.0.0.1:{}".format(port)], stdout=subprocess.PIPE, stderr=subprocess.PIPE)
  for line in p.stderr:
    l = line.decode()
    if "trycloudflare.com " in l:
      print("This is the URL to access ComfyUI:", l[l.find("http"):], end='')
    #print(l, end='')


threading.Thread(target=iframe_thread, daemon=True, args=(8188,)).start()

!python main.py --dont-print-server
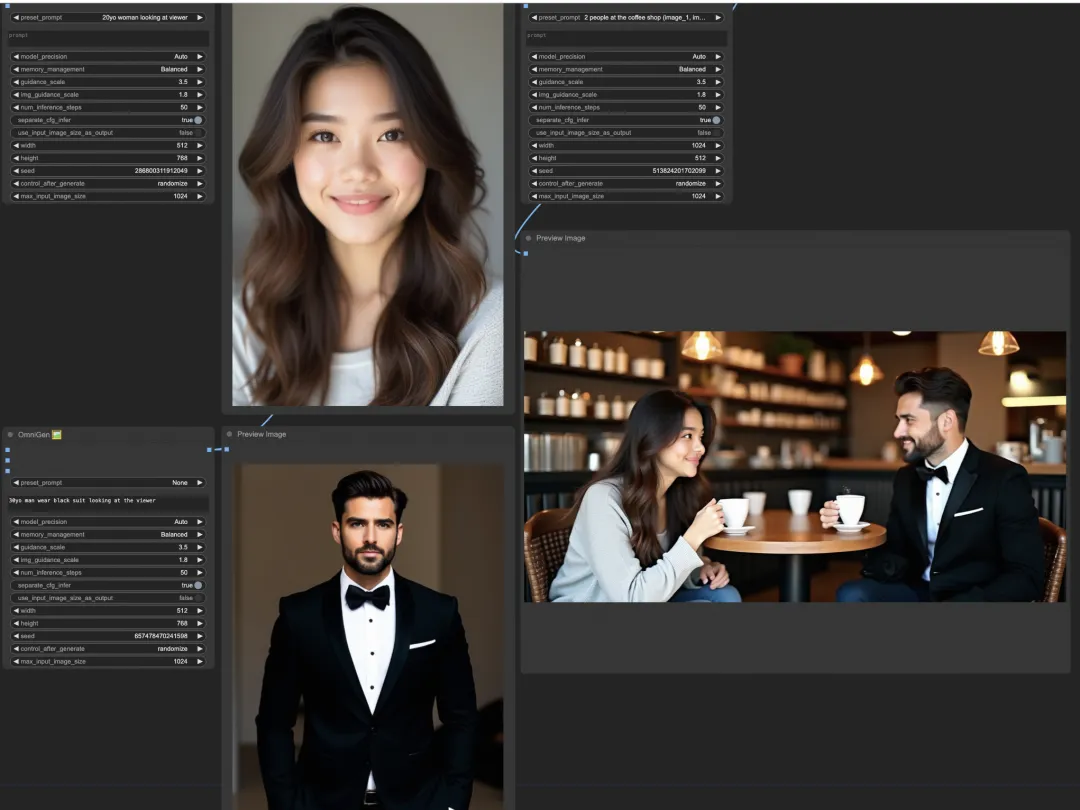
🔗导入Comfyui工作流:
https://github.com/1038lab/ComfyUI-OmniGen/tree/main/Examples
工作流示例:
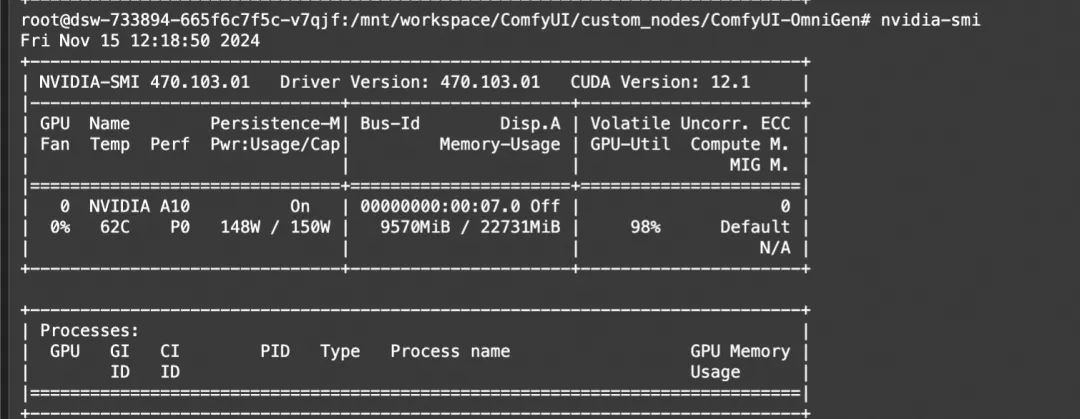
显存占用:
🔗notebook链接分享:
https://modelscope.cn/notebook/share/ipynb/aadb79ef/comfyui_omnigen.ipynb
点击链接👇,即可跳转体验~
https://modelscope.cn/studios/chuanSir/OmniGen?from=csdnzishequ_text
更多推荐
 已为社区贡献410条内容





所有评论(0)