
论文分类打榜赛Baseline:ms-swift微调InternLM实践
书生大模型实战营第5期已正式启动,本期实战营新增「论文分类打榜赛」,以帮助学员更好地掌握大模型技能。
书生大模型实战营第5期已正式启动,本期实战营新增「论文分类打榜赛」,以帮助学员更好地掌握大模型技能。
本文将手把手带领大家用 ms-swift 微调 InternLM 模型,轻松上手论文自动分类任务。涵盖了从环境配置、数据准备到模型训练、推理与评测的完整流程。即使你是模型微调新手,也能快速参与打榜实践!
InternLM开源链接:
https://github.com/InternLM/InternLM
在线体验链接:
https://chat.intern-ai.org.cn/

1.环境配置
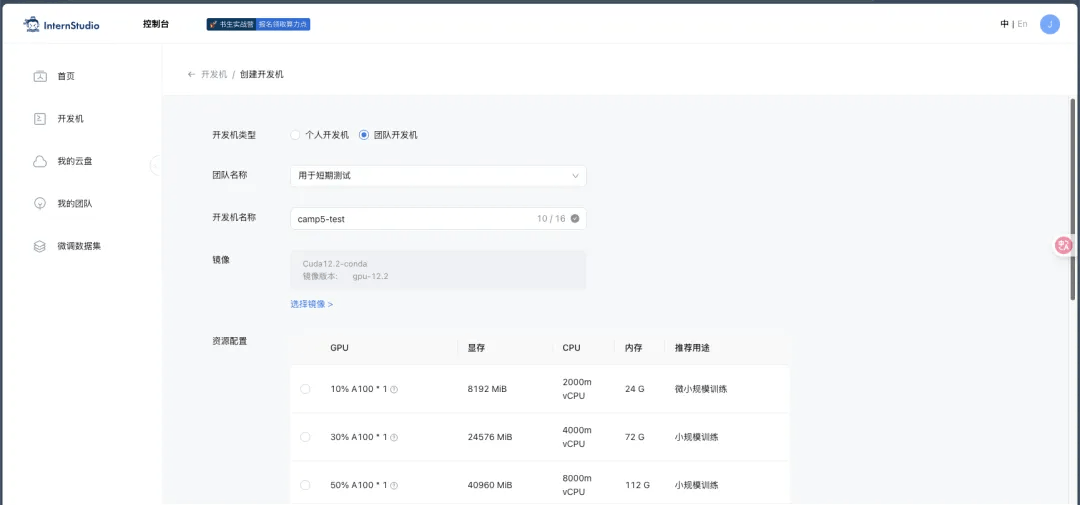
登录 InternStudio 平台,创建开发机(https://studio.intern-ai.org.cn/console/instance)。
-
镜像选择: Cuda12.2-conda
-
GPU 资源选择:50% A100
conda 管理环境安装
#安装 ms-swift
conda create -n ms-swift python=3.10 -y
conda activate ms-swift
pip install ms-swift -U
注意:后续所有的操作都需要在 ms-swift 的虚拟环境中执行,在进入新终端时需要先执行 conda activate ms-swift
创建目录 paper 文件,组织形式如下图:

2.准备训练数据
这里已经为大家准备了处理好的 arxiv 数据集和采集得到的数据。
下载链接:https://www.modelscope.cn/datasets/JimmyMa99/smartflow-arxiv-dataset/files
conda activate ms-swift
pip install modelscope
modelscope download --dataset JimmyMa99/smartflow-arxiv-dataset --local_dir ./datasets/train
3.模型训练
3.1 LoRA 预训练
预训练目的是让模型先学点论文元数据,类比基础知识。好比我们学习数学,刚开始学点加减乘除,而不是一上来就学习多元函数变微分求导。
代码
#!/bin/bash
# 创建日志目录
LOG_DIR="logs"
mkdir -p $LOG_DIR  # 确保日志目录存在,如果不存在则创建
# 获取当前时间戳,用于生成唯一的日志文件名
TIMESTAMP=$(date +"%Y%m%d_%H%M%S")
LOG_FILE="$LOG_DIR/internlm3-8b_lora_sft_${TIMESTAMP}.log"  # 设置日志文件路径
# 设置CUDA环境变量
export NPROC_PER_NODE=1  # 设置每个节点使用的进程数为1
export OMP_NUM_THREADS=1  # 限制OpenMP线程数为1,避免过多线程竞争
export CUDA_VISIBLE_DEVICES=0  # 指定使用的GPU编号为0
# 使用nohup命令在后台运行训练任务,即使终端关闭也能继续运行
nohup swift sft \
    --model /root/share/new_models/internlm3/internlm3-8b-instruct \  # 指定基础模型路径
    --train_type lora \  # 使用LoRA训练方法
    --dataset '/root/paper/data/swift_formatted_pretrain_data.jsonl' \  # 指定训练数据集
    --torch_dtype bfloat16 \  # 使用bfloat16精度以节省显存
    --num_train_epochs 1 \  # 设置训练轮数为2
    --per_device_train_batch_size 2 \  # 每个设备的训练批次大小为4
    --learning_rate 5e-5 \  # 学习率设置为5e-5
    --warmup_ratio 0.1 \  # 预热阶段占总训练步数的10%
    --split_dataset_ratio 0 \  # 不拆分数据集
    --report_to wandb \  # 将训练日志报告到Weights & Biases平台
    --lora_rank 8 \  # LoRA的秩设置为8
    --lora_alpha 32 \  # LoRA的alpha参数设置为32
    --use_chat_template false \  # 不使用聊天模板
    --target_modules all-linear \  # 对所有线性层应用LoRA
    --gradient_accumulation_steps 2 \  # 梯度累积步数为2,用于增大有效批次大小
    --save_steps 2000 \  # 每2000步保存一次模型
    --save_total_limit 5 \  # 最多保存5个检查点
    --gradient_checkpointing_kwargs '{"use_reentrant": false}' \  # 梯度检查点设置,禁用重入
    --logging_steps 5 \  # 每5步记录一次日志
    --max_length 2048 \  # 最大序列长度设为2048
    --output_dir ./swift_output/InternLM3-8B-Lora \  # 输出目录
    --dataloader_num_workers 256 \  # 数据加载器使用256个工作线程
    --model_author JimmyMa99 \  # 模型作者信息
    --model_name InternLM3-8B-Lora \  # 模型名称
    > "$LOG_FILE" 2>&1 &  # 将标准输出和错误输出重定向到日志文件,并在后台运行
# 打印进程ID和日志文件位置,便于用户跟踪
echo "Training started with PID $!"  # 显示后台进程的PID
echo "Log file: $LOG_FILE"  # 显示日志文件位置
# 提示用户如何实时查看日志
echo "To view logs in real-time, use:"
echo "tail -f $LOG_FILE"
启动
bash internlm3-8b-lora.sh
合并权重
LoRA 训练方法是通过低秩分解的方式对模型进行训练,需要将该权重合入模型主体权重。
swift export --adapters /root/paper/config/swift_output/InternLM3-8B-Lora/v1-20250510-224052/checkpoint-144 --merge_lora true
3.2 Lora 监督微调
代码
#!/bin/bash
# 创建日志目录
LOG_DIR="logs"
mkdir -p $LOG_DIR
# 获取当前时间戳
TIMESTAMP=$(date +"%Y%m%d_%H%M%S")
LOG_FILE="$LOG_DIR/internlm3-8b_lora_sft_${TIMESTAMP}.log"
# 设置CUDA设备
export NPROC_PER_NODE=1
export OMP_NUM_THREADS=1
export CUDA_VISIBLE_DEVICES=0
nohup swift sft \
    --model /root/paper/config/swift_output/InternLM3-8B-Lora/v1-20250510-224052/checkpoint-144-merged \
    --train_type lora \
    --dataset '/root/paper/data/swift_formatted_sft_train_data.jsonl' \
    --torch_dtype bfloat16 \
    --num_train_epochs 3 \
    --per_device_train_batch_size 8 \
    --learning_rate 5e-5 \
    --warmup_ratio 0.1 \
    --split_dataset_ratio 0 \
    --lora_rank 16 \
    --lora_alpha 64 \
    --lora_dropout 0.1 \
    --weight_decay 0.01 \
    --target_modules all-linear \
    --gradient_accumulation_steps 4 \
    --save_steps 1000 \
    --save_total_limit 5 \
    --gradient_checkpointing_kwargs '{"use_reentrant": false}' \
    --logging_steps 5 \
    --max_length 4096 \
    --output_dir ./swift_output/InternLM3-8B-Lora-SFT \
    --dataloader_num_workers 256 \
    --model_author zhangfucai \
    --model_name InternLM3-8B-Lora-SFT \
    > "$LOG_FILE" 2>&1 &
# 打印进程ID和日志文件位置
echo "Training started with PID $!"
echo "Log file: $LOG_FILE"
# 显示查看日志的命令
echo "To view logs in real-time, use:"
echo "tail -f $LOG_FILE"
启动
bash internlm3-8b-sft-lora.sh
合并权重
同理,需要合并权重。
swift export --adapters /root/paper/config/swift_output/InternLM3-8B-Lora-SFT/v3-20250510-231854/checkpoint-21 --merge_lora true
4.模型推理
代码
from transformers import AutoModelForCausalLM, AutoTokenizer
import time
# 加载模型和分词器
# model_path = "/root/share/new_models/internlm3/internlm3-8b-instruct"
model_path = "/root/paper/config/swift_output/InternLM3-8B-Lora/v1-20250510-224052/checkpoint-144-merged"
# model_path = "/root/paper/config/swift_output/InternLM3-8B-Lora-SFT/v3-20250510-231854/checkpoint-21-merged"
print(f"加载模型:{model_path}")
start_time = time.time()
tokenizer = AutoTokenizer.from_pretrained(model_path, trust_remote_code=True)
model = AutoModelForCausalLM.from_pretrained(
    model_path, trust_remote_code=True, torch_dtype="auto", device_map="auto"
)
def classify_paper(title, authors, abstract, additional_info=""):
    # 构建输入,包含多选选项
    prompt = f"Based on the title '{title}', authors '{authors}', and abstract '{abstract}', please determine the scientific category of this paper. {additional_info}\n\nA. astro-ph\nB. cond-mat.mes-hall\nC. cond-mat.mtrl-sci\nD. cs.CL\nE. cs.CV\nF. cs.LG\nG. gr-qc\nH. hep-ph\nI. hep-th\nJ. quant-ph"
    # 设置系统信息
    messages = [
        {"role": "system", "content": "你是个优秀的论文分类师"},
        {"role": "user", "content": prompt},
    ]
    # 应用聊天模板
    input_text = tokenizer.apply_chat_template(messages, tokenize=False)
    # 生成回答
    inputs = tokenizer(input_text, return_tensors="pt").to(model.device)
    outputs = model.generate(
        **inputs,
        max_new_tokens=10,  # 减少生成长度,只需要简短答案
        temperature=0.1,  # 降低温度提高确定性
        top_p=0.95,
        repetition_penalty=1.0,
    )
    # 解码输出
    response = tokenizer.decode(
        outputs[0][inputs.input_ids.shape[1] :], skip_special_tokens=True
    ).strip()
    # 如果回答中包含选项标识符,只返回该标识符
    for option in ["A", "B", "C", "D", "E", "F", "G", "H", "I", "J"]:
        if option in response:
            return option
    # 如果回答不包含选项,返回完整回答
    return response
# 示例使用
if __name__ == "__main__":
    title = "Outilex, plate-forme logicielle de traitement de textes 'ecrits"
    authors = "Olivier Blanc (IGM-LabInfo), Matthieu Constant (IGM-LabInfo), Eric Laporte (IGM-LabInfo)"
    abstract = "The Outilex software platform, which will be made available to research, development and industry, comprises software components implementing all the fundamental operations of written text processing: processing without lexicons, exploitation of lexicons and grammars, language resource management. All data are structured in XML formats, and also in more compact formats, either readable or binary, whenever necessary; the required format converters are included in the platform; the grammar formats allow for combining statistical approaches with resource-based approaches. Manually constructed lexicons for French and English, originating from the LADL, and of substantial coverage, will be distributed with the platform under LGPL-LR license."
    result = classify_paper(title, authors, abstract)
    print(result)
    # 计算并打印总耗时
    end_time = time.time()
    total_time = end_time - start_time
    print(f"程序总耗时:{total_time:.2f}秒")
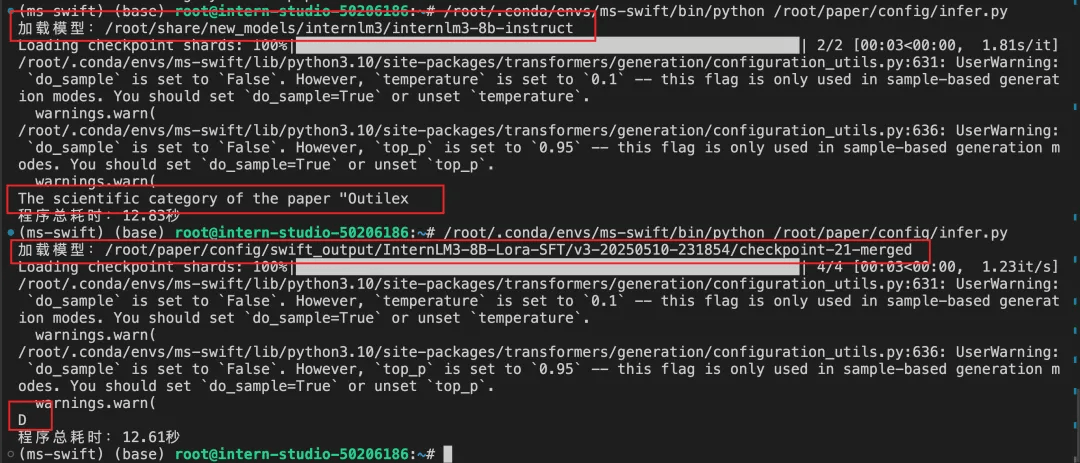
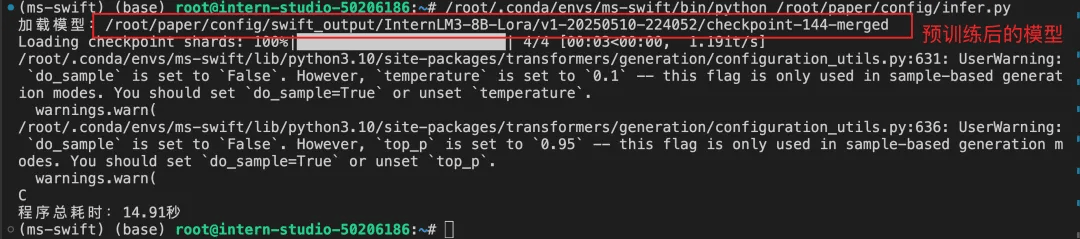
微调前后推理对比
观察下图,发现监督微调后的模型符合预期。
5.模型评测(可选)
在提交模型后,后台会自动评测,所以这部分是可选的。但不放心的小伙伴,可以先自己评测一下看看效果,自己评测的结果和最终结果差距不会很大。下面展示如何使用 OpenCompass 进行测评。
环境配置
git clone https://github.moeyy.xyz/https://github.com/open-compass/opencompass opencompass
cd opencompass
conda create -n opencompass python=3.10 -y
conda activate opencompass
pip install -e .
pip install sentencepiece
代码
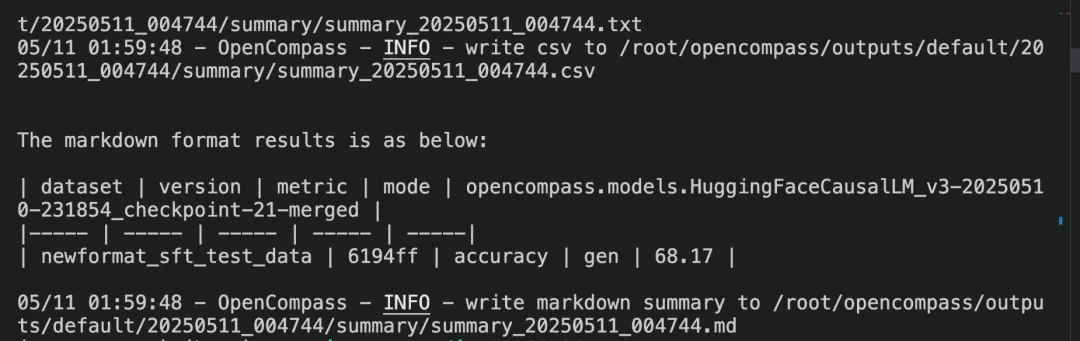
评测代码(数据 /root/datasets/train/newformat_sft_test_data.csv 是 A 榜测试数据)。
from mmengine.config import read_base
from opencompass.models import HuggingFaceCausalLM
models = [
    dict(
        type=HuggingFaceCausalLM,
        path='/root/paper/config/swift_output/InternLM3-8B-Lora-SFT/v3-20250510-231854/checkpoint-21-merged',
        tokenizer_path='/root/paper/config/swift_output/InternLM3-8B-Lora-SFT/v3-20250510-231854/checkpoint-21-merged',
        tokenizer_kwargs=dict(padding_side='left', truncation_side='left'),
        model_kwargs=dict(device_map='auto'),
        max_seq_len=32768,
        max_out_len=16384,
        batch_size=4,
        run_cfg=dict(num_gpus=1),
    )
]
datasets = [
    {"path": "/root/datasets/train/newformat_sft_test_data.csv", "data_type": "mcq", "infer_method": "gen"},
]
运行
#在opencompass目录下
python run.py internlm3-oc_eval.py --debug
结果
6.提交模型
前置条件
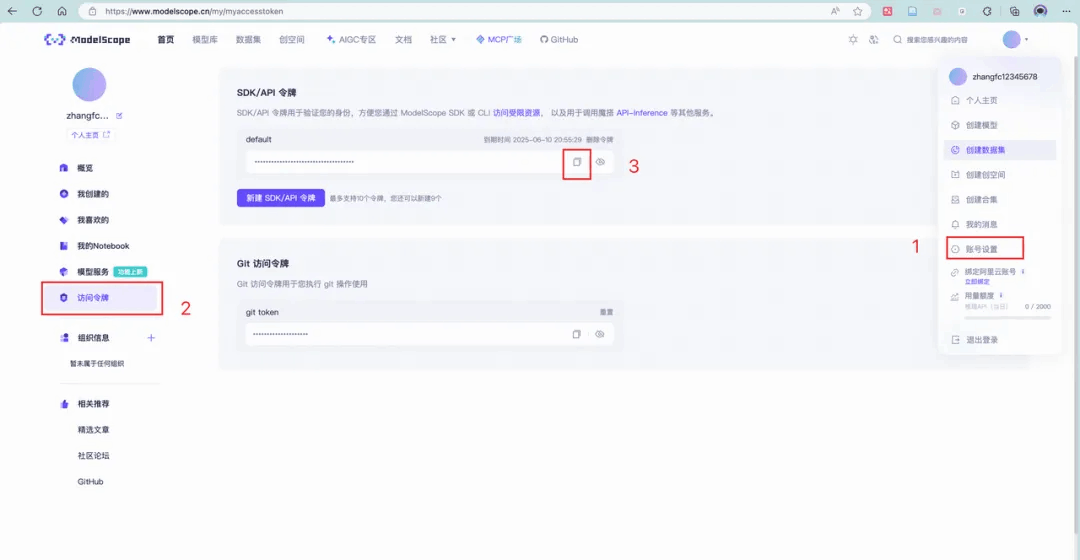
在魔搭平台创建模型仓库,并获取 hub_model_id,如下图:

在【账号设置】里获取 hub_token,如下图:
下载 git
apt-get install git-lfsgit lfs installgit lfs install
提交模型至魔搭平台
swift export \
    --model /root/paper/config/swift_output/InternLM3-8B-Lora-SFT/v3-20250510-231854/checkpoint-21-merged\
    --push_to_hub true \
    --hub_model_id 'zhangfc12345678/zfc-camp5' #替换成自己的 \
    --hub_token '03fb4fxx' \ #替换成自己的
    --use_hf false
将上传至魔搭的模型提交至比赛评测平台
填写下方表单即可完成提交
https://aicarrier.feishu.cn/share/base/form/shrcn0JkjbZKMeMPw04uHCWc5Pg
7.参赛奖励
在以下时间点,B 榜排行榜位列前 10 的选手将获得相应奖励:
-
6 月 3 日 20:00,前 10 名获得 InternStudio 平台 2000 算力点
-
6 月 10 日 20:00,前 10 名获得 InternStudio 平台 1688 算力点
-
6 月 17 日 20:00,前 10 名获得 InternStudio 平台 999 算力点
-
6 月 24 日 20:00,前 10 名获得 InternStudio 平台 666 算力点
-
6 月 30 日 20:00,前 10 名额外获得 官方证书
注:算力有效期为第五期实战营期间
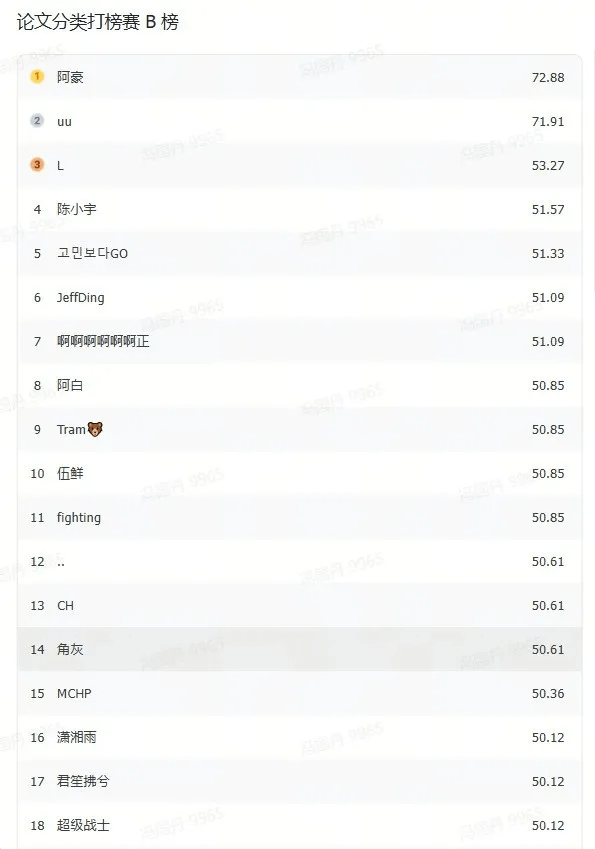
5 月 28 日榜单部分截图
访问下方链接可查看全部榜单内容https://aicarrier.feishu.cn/share/base/dashboard/shrcnqpXY6Uy9FodNF3It75GSNe
本文主要介绍了如何使用 ms-swift 对 InternLM 进行微调,并应用于论文分类任务,涵盖了从环境配置、数据准备到模型训练、推理与评测的完整流程,希望对大家参加赛事有所帮助。
点击链接,即可报名参加~
https://colearn.intern-ai.org.cn/set?s=gzh

ModelScope旨在打造下一代开源的模型即服务共享平台,为泛AI开发者提供灵活、易用、低成本的一站式模型服务产品,让模型应用更简单!
更多推荐


 0
0 0
0- 0


 已为社区贡献653条内容

所有评论(0)