
Qwen2.5 VL! Qwen2.5 VL! Qwen2.5 VL! 重要的模型说三遍!
自Qwen2-VL发布以来的五个月里,动物开发者在Qwen2-VL语言模型上构建了新的模型,为Qwen团队提供了宝贵的反馈。在此期间,Qwen团队致力于构建更有用的视觉语言模型。今天,Qwen团队很高
01.项目介绍
自Qwen2-VL发布以来的五个月里,动物开发者在Qwen2-VL语言模型上构建了新的模型,为Qwen团队提供了宝贵的反馈。在此期间,Qwen团队致力于构建更有用的视觉语言模型。今天,Qwen团队很高兴向大家介绍Qwen家族的最新成员:Qwen2.5-VL。
主要森林功能:
-
理解物体:Qwen2.5-VL不仅能够识别花、鸟、鱼、昆虫等常见物体,而且还能够分析图像中的文本、图表、图标、图形和布局。
-
代理性:Qwen2.5-VL直接扮演视觉代理的角色,具有推理和动态指挥工具的功能,可用于电脑和手机。
-
理解长视频并捕捉事件:Qwen2.5-VL可以理解超过1小时的视频,这次它还具有通过精确定位相关视频片段来捕捉事件的新功能。
-
能够进行不同格式的定位:Qwen2.5-VL可以通过生成边界框或点来准确定位图像中的物体,并且可以为坐标和属性提供稳定的JSON输出。
-
生成格式化输出:针对发票、表格、表格等扫描件数据,Qwen2.5-VL支持其内容的格式化输出,有利于金融、商业等领域的用途。
模型架构:
-
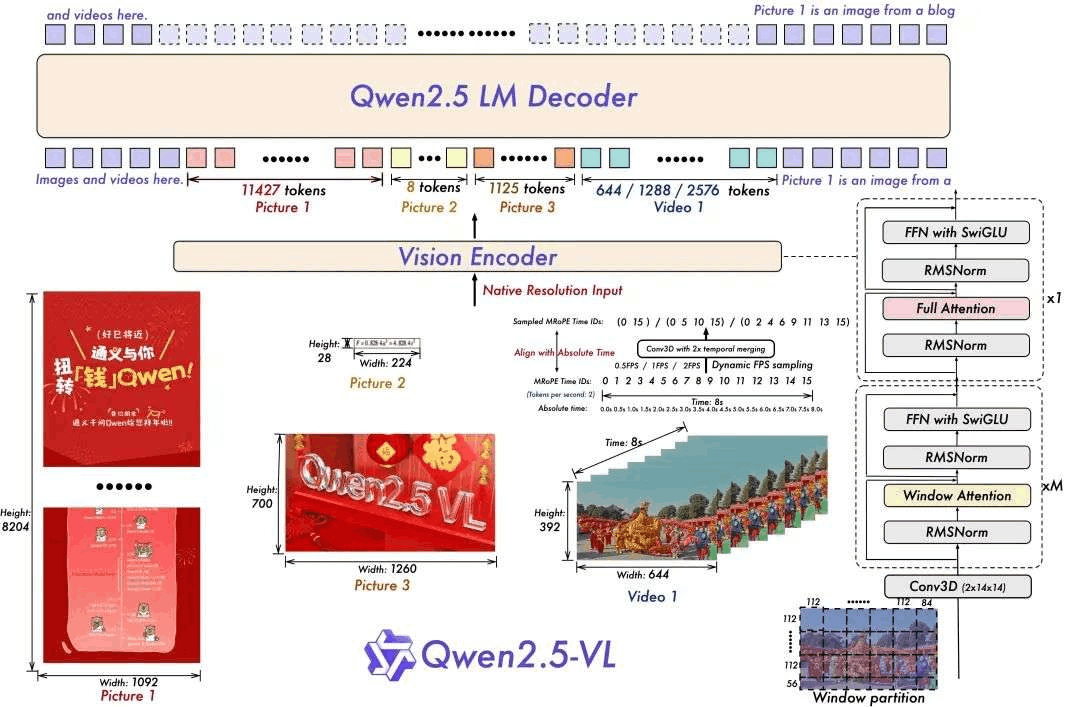
用于视频理解的动态分辨率和帧速率训练:
通过采用动态FPS采样将动态分辨率时间维度,使模型能够理解各种采样率的视频。相应地,Qwen团队在时间维度上用ID和绝对时间更新更新mRoPE,使模型能够学习时间顺序和速度,最终获得准确定位特定时刻的能力。
-
高效视觉的编码器
Qwen 团队通过策略性触发注意力机制引入 ViT,提高了训练和推理速度。ViT 架构通过 SwiGLU 和 RMSNorm 得到进一步优化,从而与 Qwen2.5 LLM 的结构保持一致。
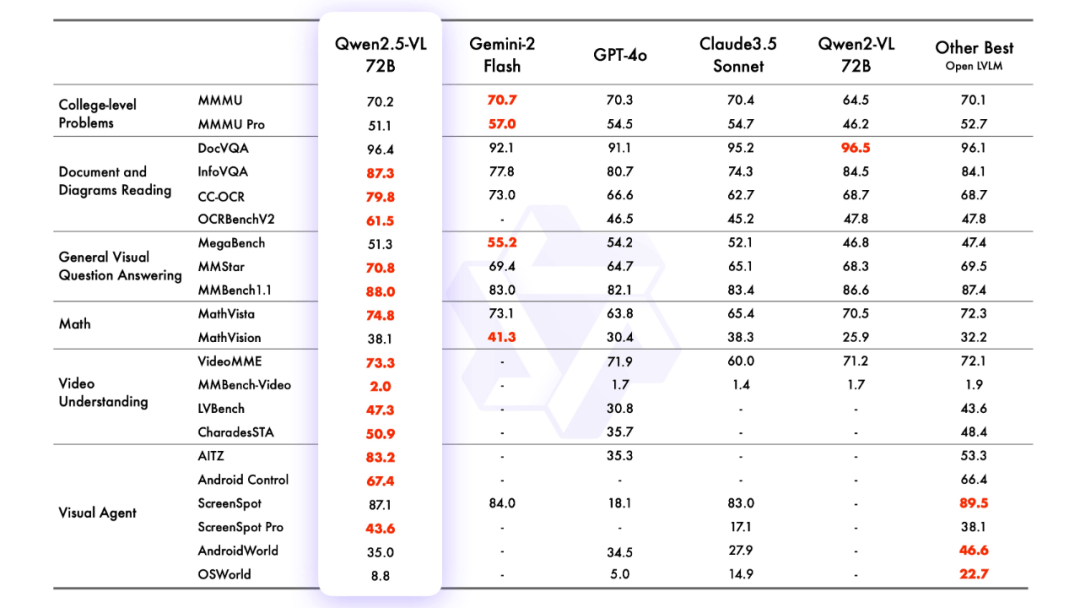
本次开源有三个模型,参数分别为30亿、70亿和720亿。此repo包含指令调整的72B Qwen2.5-VL模型。
模型合集:
https://www.modelscope.cn/collections/Qwen25-VL-58fbb5d31f1d47
模型体验:
https://chat.qwenlm.ai/
技术博客:
https://qwenlm.github.io/blog/qwen2.5-vl/
代码地址:
https://github.com/QwenLM/Qwen2.5-VL
02.程序库
体验案例
https://live.csdn.net/v/461798
项目
03.模型推理
使用transformers推理
Qwen2.5-VL 的代码已在最新的 Transformers 中,建议使用命令从源代码构建:
pip install git+https://github.com/huggingface/transformers它提供了一个工具包,可以帮助更方便地处理各种类型的窗口输入,就像使用API一样。这包括base64、URL以及交错的图像和视频。可以使用以下命令安装:
pip install qwen-vl-utils[decord]==0.0.8推理代码:
from transformers import Qwen2_5_VLForConditionalGeneration, AutoTokenizer, AutoProcessor
from qwen_vl_utils import process_vision_info
from modelscope import snapshot_download

model_dir = snapshot_download("Qwen/Qwen2.5-VL-3B-Instruct")
# default: Load the model on the available device(s)
model = Qwen2_5_VLForConditionalGeneration.from_pretrained(
    model_dir, torch_dtype="auto", device_map="auto"
)

# We recommend enabling flash_attention_2 for better acceleration and memory saving, especially in multi-image and video scenarios.
# model = Qwen2_5_VLForConditionalGeneration.from_pretrained(
#     "Qwen/Qwen2.5-VL-3B-Instruct",
#     torch_dtype=torch.bfloat16,
#     attn_implementation="flash_attention_2",
#     device_map="auto",
# )

# default processer
processor = AutoProcessor.from_pretrained(model_dir)

# The default range for the number of visual tokens per image in the model is 4-16384.
# You can set min_pixels and max_pixels according to your needs, such as a token range of 256-1280, to balance performance and cost.
# min_pixels = 256*28*28
# max_pixels = 1280*28*28
# processor = AutoProcessor.from_pretrained("Qwen/Qwen2.5-VL-3B-Instruct", min_pixels=min_pixels, max_pixels=max_pixels)

messages = [
    {
        "role": "user",
        "content": [
            {
                "type": "image",
                "image": "https://qianwen-res.oss-cn-beijing.aliyuncs.com/Qwen-VL/assets/demo.jpeg",
            },
            {"type": "text", "text": "Describe this image."},
        ],
    }
]

# Preparation for inference
text = processor.apply_chat_template(
    messages, tokenize=False, add_generation_prompt=True
)
image_inputs, video_inputs = process_vision_info(messages)
inputs = processor(
    text=[text],
    images=image_inputs,
    videos=video_inputs,
    padding=True,
    return_tensors="pt",
)
inputs = inputs.to("cuda")

# Inference: Generation of the output
generated_ids = model.generate(**inputs, max_new_tokens=128)
generated_ids_trimmed = [
    out_ids[len(in_ids) :] for in_ids, out_ids in zip(inputs.input_ids, generated_ids)
]
output_text = processor.batch_decode(
    generated_ids_trimmed, skip_special_tokens=True, clean_up_tokenization_spaces=False
)
print(output_text)
使用魔搭API-Inference直接调用
魔搭平台的API-Inference,也第一时间为Qwen2.5-VL系列模型提供了支持。魔搭的用户可以通过API调用的方式,直接使用。具体API-Inference的使用方式可参见模型页面(例如https://www.modelscope.cn/models/Qwen/Qwen2.5-VL-72B-Instruct)说明:

或者参见API-Inference文档:
https://www.modelscope.cn/docs/model-service/API-Inference/intro
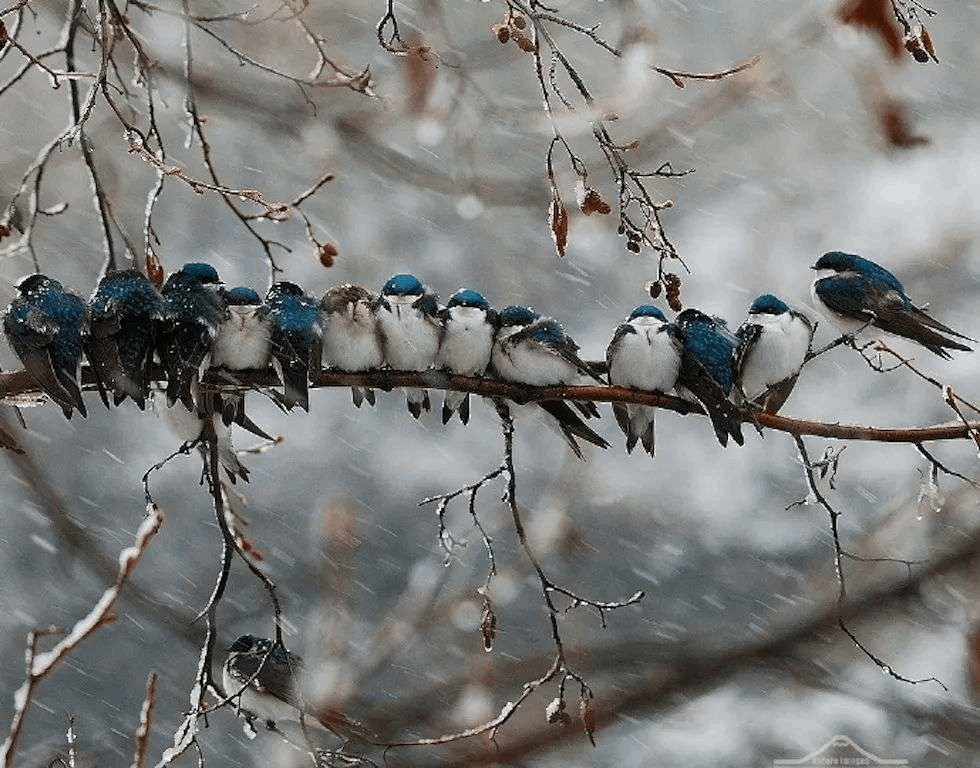
这里以下图为例,调用API使用Qwen/Qwen2.5-VL-72B-Instruct模型:
from openai import OpenAI
client = OpenAI(
    api_key="<MODELSCOPE_SDK_TOKEN>", # ModelScope Token
    base_url="https://api-inference.modelscope.cn/v1"
)

response = client.chat.completions.create(
    model="Qwen/Qwen2.5-VL-72B-Instruct", # ModleScope Model-Id
    messages = [
        {
            "role": "user",
            "content": [
                {
                    "type": "image_url",
                    "image_url": {"url": "https://modelscope.oss-cn-beijing.aliyuncs.com/demo/images/bird-vl.jpg"}
                },
                {   "type": "text",
                    "text": "Count the number of birds in the figure, including those that are only showing their heads. To ensure accuracy, first detect their key points, then give the total number."
                },
            ],
        }
    ],
    stream=True
    )


for chunk in response:
    print(chunk.choices[0].delta.content, end='', flush=True)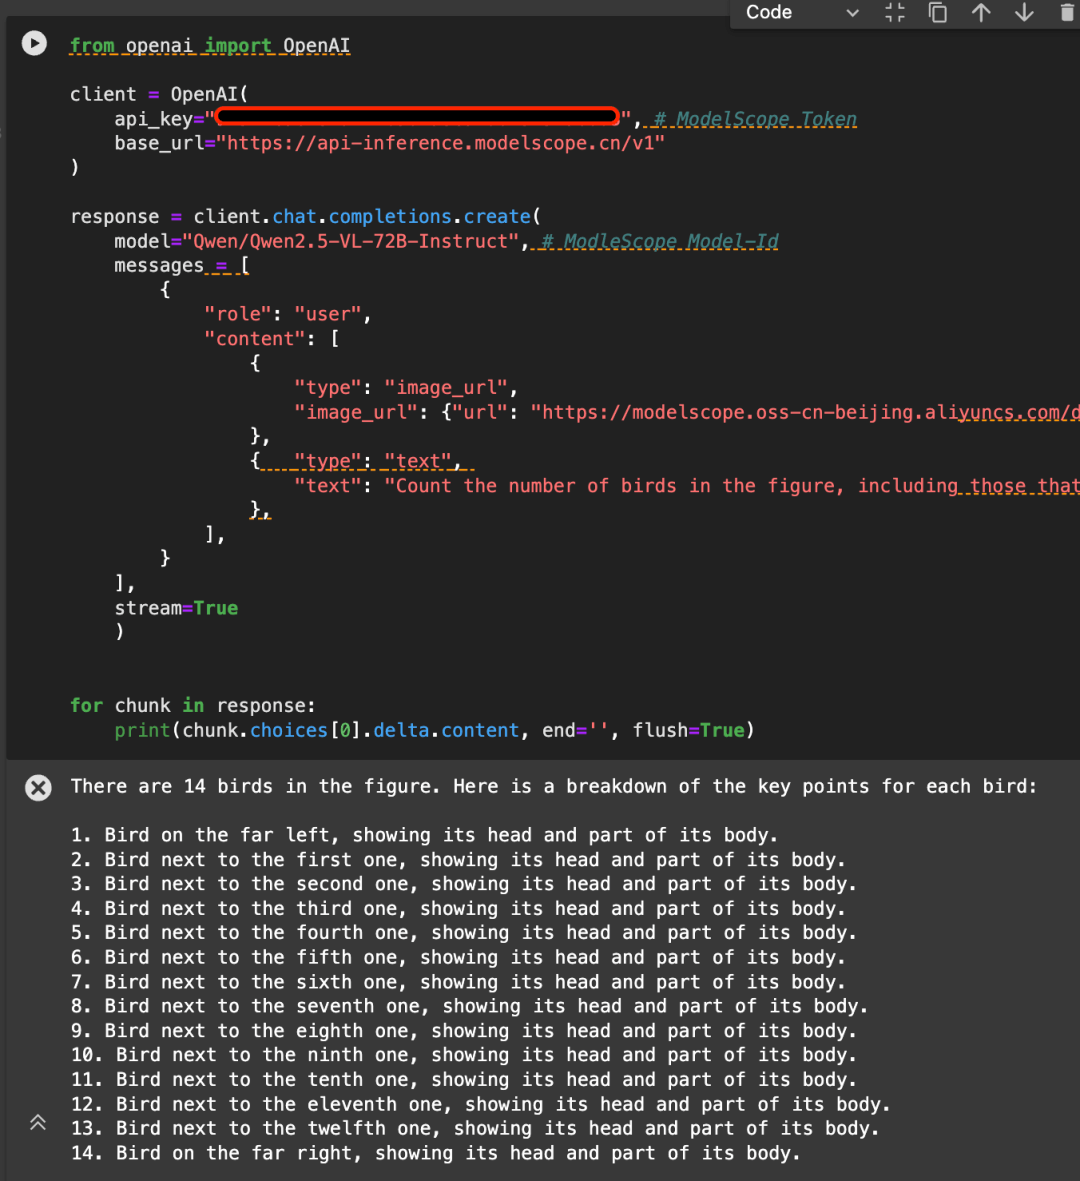
感谢阿里云百炼平台提供背后算力支持
04.模型调试
我们介绍使用ms-swift对Qwen/Qwen2.5-VL-7B-Instruct进行姿势。ms-swift是魔搭社区官方提供的大模型与多模态大模型姿势部署框架。ms-swift开源地址:https://github.com/modelscope/ms-swift
在这里,我们将展示可运行的力矩演示,并给出自定义数据集的格式。
在开始之前,请确保您的环境已准备就绪。
git clone https://github.com/modelscope/ms-swift.git
cd ms-swift
pip install -e .
ImageOCR脚本如下:
MAX_PIXELS=1003520 \
CUDA_VISIBLE_DEVICES=0 \
swift sft \
    --model Qwen/Qwen2.5-VL-7B-Instruct \
    --dataset AI-ModelScope/LaTeX_OCR:human_handwrite#20000 \
    --train_type lora \
    --torch_dtype bfloat16 \
    --num_train_epochs 1 \
    --per_device_train_batch_size 1 \
    --per_device_eval_batch_size 1 \
    --learning_rate 1e-4 \
    --lora_rank 8 \
    --lora_alpha 32 \
    --target_modules all-linear \
    --freeze_vit true \
    --gradient_accumulation_steps 16 \
    --eval_steps 50 \
    --save_steps 50 \
    --save_total_limit 5 \
    --logging_steps 5 \
    --max_length 2048 \
    --output_dir output \
    --warmup_ratio 0.05 \
    --dataloader_num_workers 4
训练显存资源:

视频微博评论如下:
# VIDEO_MAX_PIXELS等参数含义可以查看:https://swift.readthedocs.io/zh-cn/latest/Instruction/%E5%91%BD%E4%BB%A4%E8%A1%8C%E5%8F%82%E6%95%B0.html#id18
nproc_per_node=2

CUDA_VISIBLE_DEVICES=0,1 \
NPROC_PER_NODE=$nproc_per_node \
VIDEO_MAX_PIXELS=100352 \
FPS_MAX_FRAMES=24 \
swift sft \
    --model Qwen/Qwen2.5-VL-7B-Instruct \
    --dataset swift/VideoChatGPT:all \
    --train_type lora \
    --torch_dtype bfloat16 \
    --num_train_epochs 1 \
    --per_device_train_batch_size 1 \
    --per_device_eval_batch_size 1 \
    --learning_rate 1e-4 \
    --lora_rank 8 \
    --lora_alpha 32 \
    --target_modules all-linear \
    --freeze_vit true \
    --gradient_accumulation_steps $(expr 16 / $nproc_per_node) \
    --eval_steps 50 \
    --save_steps 50 \
    --save_total_limit 5 \
    --logging_steps 5 \
    --max_length 2048 \
    --output_dir output \
    --warmup_ratio 0.05 \
    --dataloader_num_workers 4 \
    --deepspeed zero2
训练显存资源:

自定义数据集格式如下(系统字段可选),只需指定`--dataset <dataset_path>`即可:
{"messages": [{"role": "user", "content": "浙江的省会在哪?"}, {"role": "assistant", "content": "浙江的省会在杭州。"}]}
{"messages": [{"role": "user", "content": "<image><image>两张图片有什么区别"}, {"role": "assistant", "content": "前一张是小猫,后一张是小狗"}], "images": ["/xxx/x.jpg", "xxx/x.png"]}
{"messages": [{"role": "system", "content": "你是个有用无害的助手"}, {"role": "user", "content": "<video>视频中是什么"}, {"role": "assistant", "content": "视频中是一只小狗在草地上奔跑"}], "videos": ["/xxx/x.mp4"]}
接地任务描述如下:
CUDA_VISIBLE_DEVICES=0 \
MAX_PIXELS=1003520 \
swift sft \
    --model Qwen/Qwen2.5-VL-7B-Instruct \
    --dataset 'AI-ModelScope/coco#20000' \
    --train_type lora \
    --torch_dtype bfloat16 \
    --num_train_epochs 1 \
    --per_device_train_batch_size 1 \
    --per_device_eval_batch_size 1 \
    --learning_rate 1e-4 \
    --lora_rank 8 \
    --lora_alpha 32 \
    --target_modules all-linear \
    --freeze_vit true \
    --gradient_accumulation_steps 16 \
    --eval_steps 100 \
    --save_steps 100 \
    --save_total_limit 2 \
    --logging_steps 5 \
    --max_length 2048 \
    --output_dir output \
    --warmup_ratio 0.05 \
    --dataloader_num_workers 4 \
    --dataset_num_proc 4
训练显存资源:

接地任务自定义数据集格式如下:
{"messages": [{"role": "system", "content": "You are a helpful assistant."}, {"role": "user", "content": "<image>描述图像"}, {"role": "assistant", "content": "<ref-object><bbox>和<ref-object><bbox>正在沙滩上玩耍"}], "images": ["/xxx/x.jpg"], "objects": {"ref": ["一只狗", "一个女人"], "bbox": [[331.5, 761.4, 853.5, 1594.8], [676.5, 685.8, 1099.5, 1427.4]]}}
{"messages": [{"role": "system", "content": "You are a helpful assistant."}, {"role": "user", "content": "<image>找到图像中的<ref-object>"}, {"role": "assistant", "content": "<bbox><bbox>"}], "images": ["/xxx/x.jpg"], "objects": {"ref": ["羊"], "bbox": [[90.9, 160.8, 135, 212.8], [360.9, 480.8, 495, 532.8]]}}
{"messages": [{"role": "system", "content": "You are a helpful assistant."}, {"role": "user", "content": "<image>帮我打开谷歌浏览器"}, {"role": "assistant", "content": "Action: click(start_box='<bbox>')"}], "images": ["/xxx/x.jpg"], "objects": {"ref": [], "bbox": [[615, 226]]}}
训练完成后,使用以下命令对训练时的验证集进行推理,
这里`--adapters`需要替换生成训练生成的最后一个检查点文件夹。 由于adapters文件夹中包含了训练的参数文件因此,不需要额外指定`--model`:
CUDA_VISIBLE_DEVICES=0 \
swift infer \
    --adapters output/vx-xxx/checkpoint-xxx \
    --stream false \
    --max_batch_size 1 \
    --load_data_args true \
    --max_new_tokens 2048
扔模型到ModelScope:
CUDA_VISIBLE_DEVICES=0 \
swift export \
    --adapters output/vx-xxx/checkpoint-xxx \
    --push_to_hub true \
    --hub_model_id '<your-model-id>' \
--hub_token '<your-sdk-token>'点击链接跳转,直达模型体验:Qwen2.5-VL

ModelScope旨在打造下一代开源的模型即服务共享平台,为泛AI开发者提供灵活、易用、低成本的一站式模型服务产品,让模型应用更简单!
更多推荐


 0
0 0
0- 0


 已为社区贡献665条内容

所有评论(0)