手把手教你捏一个自己的Agent
前言
Modelscope AgentFabric是一个基于ModelScope-Agent的交互式智能体应用,用于方便地创建针对各种现实应用量身定制智能体,目前已经在生产级别落地。
AgentFabric围绕可插拔和可定制的LLM构建,并增强了指令执行、额外知识检索和利用外部工具的能力。AgentFabric提供的交互界面包括:
- 智能体构建器:一个自动指令和工具提供者,通过与用户聊天来定制用户的智能体
- 用户智能体:一个为用户的实际应用定制的智能体,提供构建智能体或用户输入的指令、额外知识和工具
- 配置设置工具:支持用户定制用户智能体的配置,并实时预览用户智能体的性能
目前AgentFabric围绕DashScope提供的 Qwen2.0 LLM API(通义千问API如何使用_模型服务灵积(DashScope)-阿里云帮助中心 (http://aliyun.com)) 在AgentFabric上构建不同的智能体应用。
在使用DashScope提供的qwen api构建应用与定制交互的过程中,我们发现选取千亿级别参数的qwen-max或开源的qwen-72b等大规模参数模型能获得较好的工具调用和角色扮演效果。大规模参数模型效果好,但难以在消费级机器上进行本地部署调用;同时小模型如qwen-7b-chat对工具调用的能力较弱。因此本篇旨在针对AgentFabric的工具调用场景,提供可用的数据集和微调方法,使稍小的模型如qwen-7b-chat也具有能在AgentFabric中完成工具调用的能力。
环境安装
环境准备(基于modelscope镜像)
参考:swift/docs/source/LLM/Agent微调最佳实践.md at main · modelscope/swift · GitHub
# 设置pip全局镜像 (加速下载)
pip config set global.index-url https://mirrors.aliyun.com/pypi/simple/
# 安装ms-swift
git clone https://github.com/modelscope/swift.git
cd swift
pip install -e .[llm]

# 环境对齐 (通常不需要运行. 如果你运行错误, 可以跑下面的代码, 仓库使用最新环境测试)
pip install -r requirements/framework.txt  -U
pip install -r requirements/llm.txt  -U
数据准备
为训练Agent能力,魔搭官方提供了两个开源数据集:
- 魔搭通用问答知识数据集 该数据集包含了38万条通用知识多轮对话数据
- 魔搭通用Agent训练数据集 该数据集包含了3万条Agent格式的API调用数据
相关使用方式参考:swift/docs/source/LLM/Agent微调最佳实践.md at main · modelscope/swift · GitHub
为了让qwen-7b-chat能够在AgentFabric上有比较好的效果,我们尝试使用通用Agent训练数据集ms_agent对qwen-7b-chat进行微调。微调后模型确实能够在ms_agent格式的prompt下获得工具调用能力。但在AgentFabric上对工具的调用表现欠佳,出现了不调用工具、调用工具时配置的参数错误、对工具调用结果的总结错误等,10次访问能成功正确调用1次。
- 不调用工具;总结时胡编乱造

- 调用时不按要求填写参数

考虑到AgentFabric是基于大规模文本模型调配的prompt,侧重角色扮演和应用,与ms_agent的prompt格式有区别。finetuned稍小模型的通用泛化性稍弱,换格式调用确实可能存在效果欠佳的情况。
原ms_agent prompt示例
Answer the following questions as best you can. You have access to the following APIs:
1. fire_recognition: Call this tool to interact with the fire recognition API. This API is used to recognize whether there is fire in the image. Parameters: [{"name": "image", "description": "The input image to recognize fire", "required": "True"}]

Use the following format:

Thought: you should always think about what to do
Action: the action to take, should be one of the above tools[fire_recognition, fire_alert, call_police, call_fireman]
Action Input: the input to the action
Observation: the result of the action
... (this Thought/Action/Action Input/Observation can be repeated zero or more times)
Thought: I now know the final answer
Final Answer: the final answer to the original input question
Begin!

输入图片是/tmp/2.jpg,协助判断图片中是否存在着火点
# 工具
AgentFabric prompt示例
# 工具
## 你拥有如下工具:
amap_weather: amap_weather API。获取对应城市的天气数据 输入参数: {"type": "object", "properties": {"location": {"type": "string", "description": "城市/区具体名称,如`北京市海淀区`请描述为`海淀区`"}}, "required": ["location"]} Format the arguments as a JSON object.
## 当你需要调用工具时,请在你的回复中穿插如下的工具调用命令,可以根据需求调用零次或多次:
工具调用
Action: 工具的名称,必须是[amap_weather]之一
Action Input: 工具的输入
Observation: <result>工具返回的结果</result>
Answer: 根据Observation总结本次工具调用返回的结果,如果结果中出现url,请使用如下格式展示出来:
# 指令
你扮演一个天气预报助手,你需要查询相应地区的天气,并调用给你的画图工具绘制一张城市的图。
请注意:你具有图像和视频的展示能力,也具有运行代码的能力,不要在回复中说你做不到。
(。你可以使用工具:[amap_weather])朝阳区天气怎样?
ms_agent_for_agentfabric数据集
ms_agent 更新数据
为解决上述的prompt格式不匹配问题,我们首先将ms_agent转换成AgentFabric的prompt组织格式。从ms_agent到AgentFabric的转换过程可以通过如下脚本实现:
import json
import re
sys_prefix = "\n# 工具\n\n## 你拥有如下工具:\n\n"
def _process_system(text):
apis_info = []
api_pattern = r"(?<=\n\d\.)(.*?})(?=])"
apis = re.findall(api_pattern,text,re.DOTALL)
sys_prompt = sys_prefix
func_names = []
for api in apis:
func_name = re.search(r'(.*?):', api).group(1).strip()
func_names.append(func_name)
api_name = re.search(r'(\S+)\sAPI', api).group(1)
api_desc = re.search(r"useful for\?\s(.*?)\.",api).group(1)
sys_prompt += f"{func_name}: {api_name} API。{api_desc}" + "输入参数: {\"type\": \"object\", \"properties\": {"
paras = re.findall(r"Parameters: \[({.*})",api,re.DOTALL)
required_paras = []
for para in paras:
para_name = re.search(r'"name": "(.*?)"',para).group(1)
desc = re.search(r'"description": "(.*?)"',para).group(1)
if re.search(r'"required": "(.*)"',para).group(1).strip().lower() == "true": required_paras.append(para_name)
sys_prompt += f'"\{para_name}\": {{\"type\": \"string\", \"description\": \"{desc}\"}}'
sys_prompt += "},\"required\": " + json.dumps(required_paras) + "} Format the arguments as a JSON object." + "\n\n"
func_names = json.dumps(func_names)
sys_prompt += f"## 当你需要调用工具时,请在你的回复中穿插如下的工具调用命令,可以根据需求调用零次或多次:\n\n工具调用\nAction: 工具的名称,必须是{func_names}之一\nAction Input: 工具的输入\nObservation: <result>工具返回的结果</result>\nAnswer: 根据Observation总结本次工具调用返回的结果,如果结果中出现url,请使用如下格式展示出来:\n\n\n# 指令\n\n你扮演AI-Agent,\n你具有下列具体功能:\n下面你将开始扮演\n\n请注意:你具有图像和视频的展示能力,也具有运行代码的能力,不要在回复中说你做不到。\n"
return sys_prompt
jsonl_file_path = 'ms_agent/train_agent_react.jsonl'
target_file_path = 'new_ms_agent.jsonl'
modified_data = []
with open(jsonl_file_path, 'r', encoding='utf-8') as file:
for line in file:
json_obj = json.loads(line)
system_prompt = json_obj["conversations"][0]["value"]
json_obj["conversations"][0]["value"] = _process_system(system_prompt)
modified_data.append(json_obj)
with open(target_file_path, 'w', encoding='utf-8') as file:
for json_obj in modified_data:
file.write(json.dumps(json_obj, ensure_ascii=False) + '\n')
转换后的30000条数据已上传至modelscope数据集,参考数据集链接:
https://modelscope.cn/datasets/AI-ModelScope/ms_agent_for_agentfabric/summary
使用该数据集finetune后,得到的模型在AgentFabric上的效果明显好转:每次访问都能够去调用工具,且基本能正确调用工具。但同时也有对工具调用结果的总结稍弱、有时无法自动停止输出等问题。
- 总结能力稍弱:已经查询到天气,仍回答“无法获取实时天气数据”

- 停止能力稍弱:未生成终止符,多次调用同一工具同一参数

AgentFabric新增数据
ms_agent数据集全为英文、且并无AgentFabric的roleplay等内容信息。虽然基模型qwen-7b-chat拥有中文能力,使通过new_ms_agent 数据集finetune后的模型能够正常识别用户意图,正确调用工具;但总结和停止能力都稍弱。 为此,我们通过开源的AgentFabric框架实际调用访问,获得了一些AgentFabric使用过程中实际发送给模型的prompt。筛选处理成一个数据集,加上new_ms_agent的数据一起finetune。得到的模型在AgentFabric上修复了此前的总结稍弱、有时无法自动停止问题。
- 多次调用均响应正常,甚至有一次get到了instruction中的内容。

处理好的488条数据已上传至modelscope数据集,可通过如下链接访问下载:
效果评估
测试数据来自以下数据集:
- https://modelscope.cn/datasets/AI-ModelScope/ms_agent_for_agentfabric/summary
- https://modelscope.cn/datasets/iic/ms_bench/summary
以上数据混合后,按照1%比例采样作为test data

备注: 横轴为训练步数,纵轴为准确率
总结
我们在原有的两个用于agent训练集上又额外的增加了基于AgentFabric 版本的数据集,目前可供参考的agent应用数据集如下:
- 魔搭通用agent数据集(agentfabric版)该数据集包含了30488条可支持AgentFabric格式的API调用数据
- 魔搭通用问答知识数据集 该数据集包含了38万条通用知识多轮对话数据
- 魔搭通用Agent训练数据集 该数据集包含了3万条Agent格式的API调用数据
微调流程
训练准备,以下执行过程参考了用消费级显卡微调属于自己的Agent!
在gpu机器执行
将new_ms_agent.jsonl和addition.jsonl两个文件的具体路径通过--custom_train_dataset_path进行配置后,在8* A100 环境中可通过以下命令开启训练,需约2-3小时;如果是单卡训练,需要修改nproc_per_node=1。
# Experimental environment: A100

cd examples/pytorch/llm

# 如果使用1张卡则配置nproc_per_node=1
nproc_per_node=8

export PYTHONPATH=../../..

# 时间比较久,8*A100需要 2+小时,nohup运行
nohup torchrun \
    --nproc_per_node=$nproc_per_node \
    --master_port 29500 \
    llm_sft.py \
    --model_id_or_path qwen/Qwen-7B-Chat \
    --model_revision master \
    --sft_type lora \
    --tuner_backend swift \
    --dtype AUTO \
    --output_dir output \
    --custom_train_dataset_path ms_agent_for_agentfabric/new_ms_agent.jsonl ms_agent_for_agentfabric/addition.jsonl
    --train_dataset_mix_ratio 2.0 \
    --train_dataset_sample -1 \
    --num_train_epochs 2 \
    --max_length 2048 \
    --check_dataset_strategy warning \
    --lora_rank 8 \
    --lora_alpha 32 \
    --lora_dropout_p 0.05 \
    --lora_target_modules ALL \
    --self_cognition_sample 3000 \
    --model_name 卡卡罗特 \
    --model_author 陶白白 \
    --gradient_checkpointing true \
    --batch_size 2 \
    --weight_decay 0.01 \
    --learning_rate 5e-5 \
    --gradient_accumulation_steps $(expr 1 / $nproc_per_node) \
    --max_grad_norm 0.5 \
    --warmup_ratio 0.03 \
    --eval_steps 100 \
    --save_steps 100 \
    --save_total_limit 2 \
    --logging_steps 10 &
训练完成后,能在nohup.out文件看到最后的 log 显示最佳checkpoint的存放路径best_model_checkpoint: /home/workspace/swift/examples/pytorch/llm/output/qwen-7b-chat/v0-20240314-211944/checkpoint-2828
[INFO:swift] best_model_checkpoint: /home/workspace/swift/examples/pytorch/llm/output/qwen-7b-chat/v0-20240314-211944/checkpoint-2828
[INFO:swift] images_dir: /home/workspace/swift/examples/pytorch/llm/output/qwen-7b-chat/v0-20240314-211944/images
[INFO:swift] End time of running main: 2024-03-14 23:33:54.658745
部署模型
此时我们获得了一个自己的finetuned model,可以将它部署到自己的机器上使用。以下执行过程参考了swift/docs/source/LLM/VLLM推理加速与部署.md at main · modelscope/swift · GitHub
1)合并lora
由于sft_type=lora,部署需要先将LoRA weights合并到原始模型中:
python tools/merge_lora_weights_to_model.py --model_id_or_path /dir/to/your/base/model --model_revision master --ckpt_dir /dir/to/your/lora/model其中需要替换 /dir/to/your/base/model 和 /dir/to/your/lora/model为自己本地的路径, /dir/to/your/lora/model为训练最终的best_model_checkpoint。/dir/to/your/base/model 可以通过snapshot_download接口查看,训练时使用的基模型为qwen/Qwen-7B-Chat,则本地路径为:
from modelscope import snapshot_download
base_model_path = snapshot_download('qwen/Qwen-7B-Chat')
print(base_model_path)
也可以直接使用swift export指令完成merge lora
CUDA_VISIBLE_DEVICES=0 swift export \
    --ckpt_dir '/path/to/qwen-7b-chat/vx-xxx/checkpoint-xxx' --merge_lora true
执行后完成后得到merge后的ckpt路径。
[INFO:swift] Saving merged weights...
[INFO:swift] Successfully merged LoRA and saved in /home/workspace/swift/examples/pytorch/llm/output/qwen-7b-chat/v0-20240314-211944/checkpoint-2828-merged.
[INFO:swift] End time of running main: 2024-03-18 10:34:54.307471
2)拉起部署
nohup python -m vllm.entrypoints.openai.api_server --model /dir/to/your/model-merged --trust-remote-code &
需要将/dir/to/your/model-merged替换成自己本地merge后的ckpt路径。
当nohup.out文件显示以下信息时,表示部署完成
INFO:     Started server process [531583]
INFO:     Waiting for application startup.
INFO:     Application startup complete.
INFO:     Uvicorn running on http://0.0.0.0:8000 (Press CTRL+C to quit)
测试部署:需要将/dir/to/your/model-merged替换成自己本地merge后的ckpt路径
curl http://localhost:8000/v1/completions -H "Content-Type: application/json" -d '{"model": "/dir/to/your/model-merged", "prompt": "San Francisco is a", "max_tokens": 7, "temperature": 0}'
也可以使用swift deploy 进行模型部署
CUDA_VISIBLE_DEVICES=0 swift deploy --ckpt_dir /path/to/qwen-7b-chat/vx-xxx/checkpoint-xxxx-merged这种方式下测试部署和之后的config配置中的`"model"`需要改为qwen-7b-chat
Modelscope-Agent中使用
简单测试
可通过如下代码简单测试模型能力,使用时需要将/dir/to/your/model-merged替换成自己本地merge后的ckpt路径。
from modelscope_agent.agents.role_play import RolePlay  # NOQA


def test_weather_role():
    role_template = '你扮演一个天气预报助手,你需要查询相应地区的天气,并调用给你的画图工具绘制一张城市的图。'

    llm_config =  {
        "model_server": "openai",
        "model": "/dir/to/your/model-merged",
        "api_base": "http://localhost:8000/v1",
        "is_chat": True,
        "is_function_call": False,
        "support_stream": False
    }
    #llm_config = {"model": "qwen-max", "model_server": "dashscope"}

    # input tool name
    function_list = ['amap_weather']

    bot = RolePlay(
        function_list=function_list, llm=llm_config, instruction=role_template)

    response = bot.run('朝阳区天气怎样?')

    text = ''
    for chunk in response:
        text += chunk
    print(text)
    assert isinstance(text, str)


test_weather_role()
Agentfabric中使用
- 进入agentfabric目录
cd modelscope-agent/apps/agentfabric
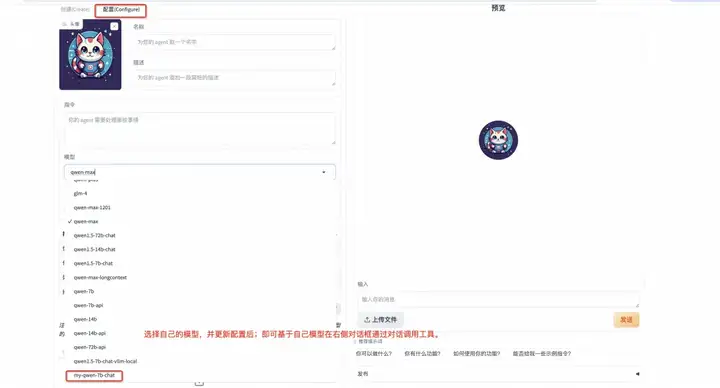
- 在config/model_config.json文件,新增训好的本地模型
"my-qwen-7b-chat": {
        "type": "openai",
        "model": "/dir/to/your/model-merged",
        "api_base": "http://localhost:8000/v1",
        "is_chat": true,
        "is_function_call": false,
        "support_stream": false
    }
再次提醒,如果使用swift deoloy部署模型需要将"model"改为qwen-7b-chat
3. 设置API key。在以下实践中,会调用wanx image generation
和高德天气 ,需要点击链接按照教程进行注册并手动设置API KEY
export DASHSCOPE_API_KEY=your_api_key
export AMAP_TOKEN=your_api_key
4. 在agentfabric目录下执行如下命令拉起gradio
GRADIO_SERVER_NAME=0.0.0.0 PYTHONPATH=../../ python app.py
然后在浏览器中输入你 服务器IP:7860打开即可看到如下界面

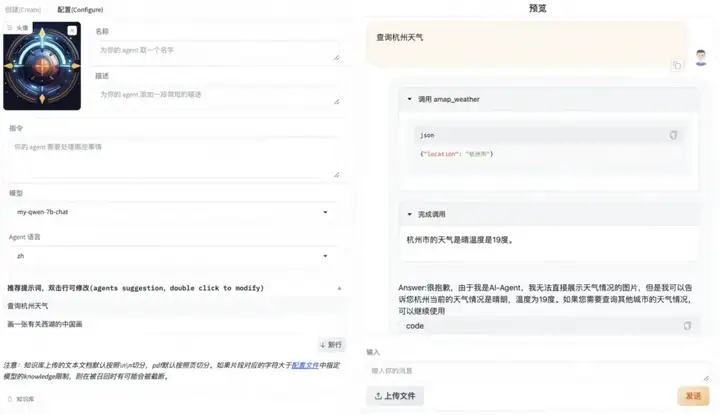
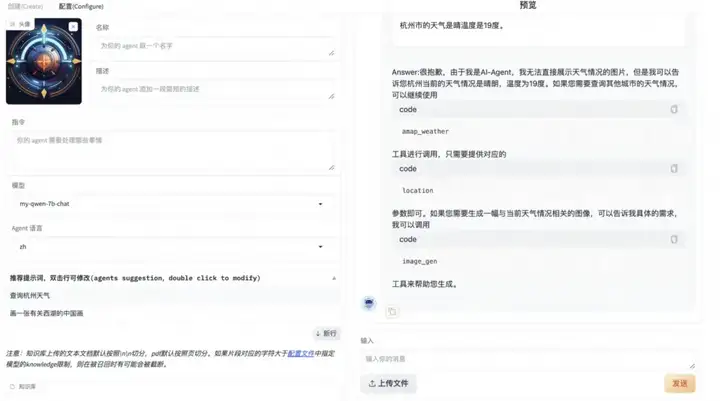
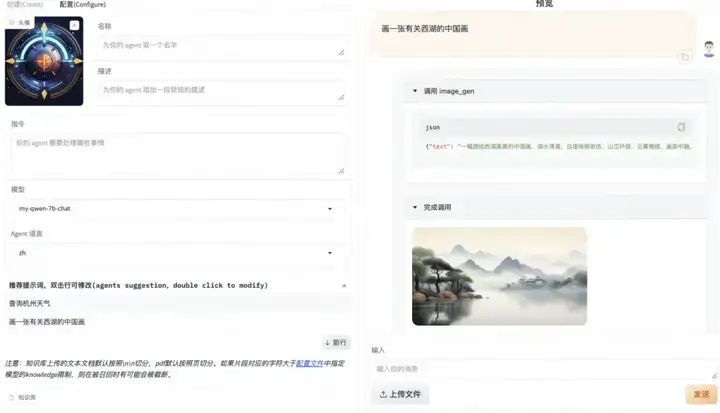
内置能力选择agent可以调用的API, 这里选择`Wanx Image Generation`和`高德天气` 点击更新配置,等待配置完成后在右侧的输入栏中即可与Agent交互


更多推荐
 已为社区贡献660条内容


所有评论(0)